HomeMy WebsiteAbout mePocket PatchworkFreebie Patterns

Sunday, April 29, 2012

Dream Come True!


Inside of this box is a genuine dream come true! 

It arrived several weeks ago, and contained the results of many months
of planning, creativity, and heartfelt work to produce......

my very first fabric line with Marcus Brothers Fabrics, called

Heart of the Prairie!

A family near Broken Bow, NE.  c. 1888.  Treadle sewing machines were often included in family
photos of this era, as they were very proud to show they owned one.

My inspiration for Heart of the Prairie came from many of the antique quilts I own made in the nineteenth century.  I'm very fond of simple calico prints, and chose to
feature the popular Indigo blues, pinks, and soft greens of the era. 
These simple prints echo the simple life of early America. 

I also chose to add two floral prints that, in my mind, would have been something a Prairie woman would have chosen, to make a special Sunday dress, to wear to church, and other social gatherings.

Most of the light print backgrounds feature a new finish I call "Prairie Dirty",
giving them a feel of comfort that comes from daily use, and the
gentle aged patina of soft wear, as nothing stayed white and clean on the Prairie!


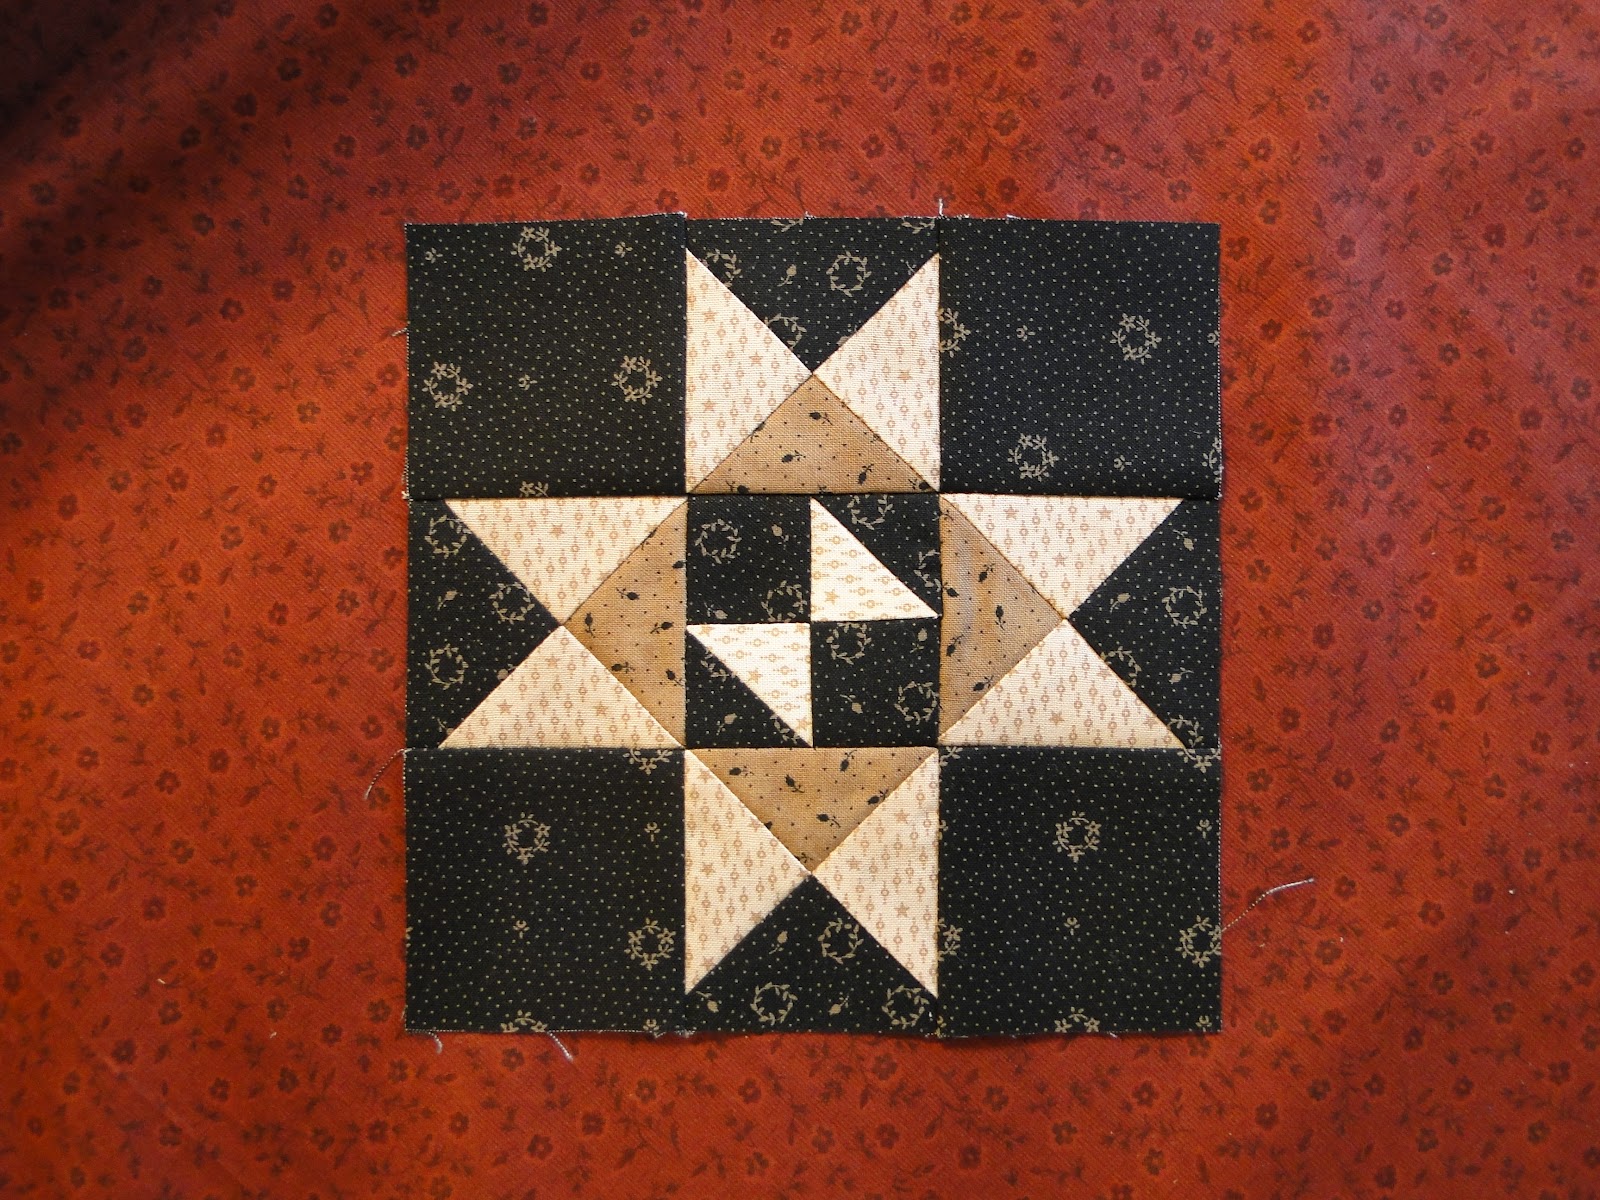
Here's a sneak peek of one of the quilts I've created using the Heart of the Prairie collection.

I've created three new individual quilt patterns using my new collection, and will reveal them here in the next few weeks. In addition, several of the quilts/projects in Journey Four of the
Prairie Women's Sewing Circle club also use my fabrics.

  Heart of the Prairie is scheduled to be delivered to quilt shops in July.

Visit Marcus Brothers Fabrics on May 1st to see the entire collection!
Click here to see my profile.
My deepest thanks to Faye, Pati & Stephanie at Marcus Brothers!  You made this wonderful journey a joy from beginning to end, and I loved every moment working with you!

I hope you will enjoy the Heart of the Prairie collection, and create a quilt that will
...Journey the threads of time! รข


Pam

Friday, April 27, 2012

Pocket Patchwork ~ Busy Work ~ Part Five


It's part five of our Pocket Patchwork sew-along and time to sew our blocks together.  Here are the next set of instructions for our Busy Work quilt......

Cutting Instructions

*Cut (1) 1 1/2 inch black square for the center.
*Cut (4) 1 1/2 inch x 6 1/2 inch strips for sashing.

Piecing Instructions

1). Arrange the pieces for the quilt center as shown.

2). Sew together into rows; in all cases press to the sashing.

3). Sew rows together; press.  Your Busy Work quilt center should measure 13 1/2 inches square.


Not a whole lot of piecing today because I want you to rest up!  We'll have a bit more piecing to do in Part Six, when we put the finishing touches on our Busy Work quilt.  I think our little quilt is cute just the way it is, but trust me, it's gonna get even better! 

If you're just tuning in and want to participate in my Pocket Patchwork Sew-alongs, it's not too late!  To receive the instructions for Parts One thru Four, find the Pocket Patchwork ~ Busy Work label on the right column of my blog.  Going forward, the best and easiest way to receive the instructions is to enter your email address in the "Follow by Email" icon, also found in the right column.  While you're at it, become a follower of my blog as well! 

I can hardly wait for you to see Part Six!  So exciting!!!


Thursday, April 26, 2012

You're Invited! Quiltmaker 100 Blocks Blog Tour!


Another great issue of Quiltmaker magazine's 100 Blocks by Today's Top Designers is about to hit the newsstand!  I'm honored, once again, to be included in this special issue with an original block for you to play with. 

To kick off the new Volume 5 issue, they're having a Blog Tour starting April 30th,
and you're invited!

Be sure to visit my blog on May 1st, which is my day on the hop. 

I'll show you my block, tell you a bit about it, and have a few prizes for a give-away!  Click here to go to the official Quiltmaker's blog for links to all of the designers on the hop. Hop along with us for a look at some of the awesome blocks included in the magazine, and your chance for loads of prizes from the designers and Quiltmaker magazine, too!


Monday, April 23, 2012

Lucy's Prairie Pockets!


Lucy's Prairie Pockets pattern is all finished!

I just had the best time creating a bunch of these pockets for my new pattern.  Not familiar with what a Prairie Pocket is?  Here's a bit of early American history to fill you in......

Lucy Locket lost her pocket,
Kitty Fisher found it,
Not a penny was there in it,
Only ribbon round it!

This nursery rhyme, published in England in 1842, tells of poor Lucy losing her pocket, which was very likely a  fabric pocket worn separately, on top of her petticoats, and worn under her skirt or dress.  17th, 18th and 19th century American women made and used these pockets as well, as their clothes contained no sewn-in pockets as we know them today.  The pockets were flat, and somewhat U-shaped, that tied around her waist.  A slit in the side of her outer skirt allowed the women discreet access to the pocket and its belongings, which lay underneath.  Women wore these pockets singly, and in pairs, which helped to accentuate her hips, being the style at the time. 
Pockets were made from every fabric imaginable.  Some were embellished with beautiful crewel and embroidery work, some with patchwork and scraps, and others of plain cloth.  Women kept all kind of needful things in their pockets such as letters, books, glasses, etc., and of course, thimbles, needles, thread, and patchwork.  At night, they often hung from the bedpost to hold a watch, handkerchief or glasses. 

Pockets were very much a part of housewifery in early America, and today, we can enjoy making a pocket for our own needful things, to wear as we work, or just to decorate a room. 

If you love reproducing old, antique quilts, and are a fan of early American life, Journey the Threads of Time, and make a Prairie Pocket for your collection!  It's a wonderful way of piecing the past!


Pockets come in two sizes.  The small pocket measures 6.5 x 8.5 inches, and the large pocket measures 11 x 14 inches.  These are historically correct sizes.


My Lucy's Prairie Pockets pattern features instructions for three different types of pockets:
A plain front which will showcase a beautiful reproduction print, a pieced tumbler front, and a hexagon front, for a wonderful scrappy look.  The pattern cover features both photos seen here. 

Click here to order Lucy's Prairie Pockets pattern and create a bit of history for yourself!

Thanks so much for taking a moment to visit with me today!

Pam


Friday, April 20, 2012

Pocket Patchwork ~ Busy Work ~ Part Four


Back again for our fourth installment of Pocket Patchwork.  We're half way through our sew-along!

Here are your instructions for block four of our Busy Work quilt......

Cutting Instructions
*Cut (4) 2 1/2 inch black squares for corners.
*Cut (2) 3 1/4 inch light squares - crosscut twice on diagonal for Quarter Square Triangles.
*Cut (1) 3 1/4 inch black square - crosscut twice on diagonal for Quarter Square Triangles.
*Cut (1) 3 1/4 inch brown square - crosscut twice on diagonal for Quarter Square Triangles.
*Cut (2) 1 1/2 inch black squares for Odds & Ends center unit.
*Cut (1) 1 7/8 inch light square for Half Square Triangle - Odds & Ends center unit.
*Cut (1) 1 7/8 inch black square for Half Square Triangle - Odds & Ends center unit.


Piecing Instructions

1). Draw a diagonal line on the wrong side of the 1 7/8 inch light print square.  Match with the black print square and sew 1/4 inch on each side of the drawn line.  Cut apart and press to the dark.  Make (2) Half Square Triangles should measure 1 1/2 inches unfinished.  Sew the HST's and the 1 1/2 inch black squares into an Odds & Ends center unit as shown, which should measure 2 1/2 inches unfinished.

2). Sew Quarter Square Triangles together as shown to measure 2 1/2 inches.

3).  Arrange the pieces as shown and sew together into rows; press.  Sew rows together; press.

Block should measure 6 1/2 inches unfinished.


Merrily we sew-along......

Monday, April 16, 2012

Tussy Mussy Is Ready To Go!


My Tussy Mussy pattern is all finished and she's looking just lovely with her adorable Nosegay block!  A month or so ago, I mentioned the history of the term Tussy Mussy, but in case you didn't catch that, I thought it worth repeating this fun eighteenth century bit of trivia. 

Tussy Mussy is another name for a floral Nosegay bouquet.  In the 1800's, women often received a Tussy Mussy from their suitors.  Each flower in the bouquet had meaning and the women often referred to a book, called The Tussy Dictionary, to decipher the floral message her suitor was conveying!  I thought it was a fun name for this quilt featuring a Nosegay block!

Click here if you'd like to order a Tussy Mussy pattern and I'll get it off to you mucho pronto! 

*~*~*~*~*~*~*~*~*~*~*~*~*~*~*~*~*~*~*~*~*~*~*~*~*~*~*~*~*~*

I haven't been talking too much about what else is happening here in the Heartspun Quilts studio since I returned from my weekend at Mill Creek Settlement Retreat.  There's a reason why. 

I had just a wonderful time with my girlfriends at Mill Creek, and it was a very productive weekend as well.  Everything you want from a weekend away.  I came home feeling more relaxed, happy in the satisfaction of what I finished there, recharged and ready for an extremely busy work week writing patterns and other design work on the computer.  I had launched our Busy Work sew-along that Friday, and since I had been in a cell phone and internet black hole, I was anxious to check my emails and blog, so after a couple of hours of family time, I sat at my computer. 

While I was away, and my computer was totally turned OFF, Windows had done another update that corrupted my user profile AGAIN!  The same thing that happened to me a few months ago, happened again....despite having changed the settings on my computer to stop auto updates.  I'll save you all the descriptive "pretty" words I said, and the rage I felt...I'm sure you get the picture.  All of the stress came rushing back.  I had an extremely busy week starting the next day,  Monday, and needed the computer, so I had no choice but to work with tech support Sunday night to have it all fixed so I could start on Monday.  Monday morning I was able to work, and put in very productive days Monday and Tuesday.  Tuesday evening, while backing up all my work, I began to get warning notices that a hard drive crash was imminent.  Wednesday morning my hard drive crashed and burned.  At the busiest time of my year, when I needed it the most, my hard drive crashed.  No easy or quick fix for that....just hand the computer over to the geeks and let them do their thing. I have about 25 adjectives you can insert here for what I was feeling.  Take your pick!  {grin}  {long exhale}  {prayers to the Almighty for strength} 

I have another notebook computer that I take on the road with me, so I enacted Plan B, and tried to limp along for the week with the notebook.  I dared not talk with you about this "trauma" until my head was in a better place - hence my ability to catch you up today.  The great news was that I had backed up all my files and didn't loose any work product.  I lost a week of good production, but the past is gone and we just move forward.  A new hard drive naturally has nothing on it, so slowly but surely I've been re-loading my programs onto the computer. 

The morale of my story is that you can survive a hard drive crash and live to tell about it!  Even when it happens at the worst time possible.  I can't make up for the lost week of work, and some things won't be perfectly ready for market, but life goes on, right!  So, that explains why I didn't blog about Mill Creek, and haven't been as chatty.  I didn't want to Scrooge you with any Bah Humbugs about our love/hate relationship with our computers. 

I'm off to spend my day with my pal, Bernina.  She never causes me stress, oh no...quite the opposite!  We have a great time together!  Hope you can spend at least part of your day with your sewing machine, too!

Pam

Friday, April 13, 2012

Pocket Patchwork ~ Busy Work ~ Part Three


Are you still with me?  From the comments I've been getting, it looks like I have quite a few friends sewing along with me!  I must say, it's really so very nice to sew with friends!  Thanks!!

I've received a few emails asking for yardage information, and I'm sorry I hadn't figured that out well ahead of time.  I've been in crush-pre market-mode, and didn't make the entire quilt before beginning our sew-along, so I don't have yardage figures for you this time, but rest assured, I'll do better next time!  My apologies for any inconvenience this may cause you and I hope you'll join me anyway.

Well...enough of that...let's get to Block Three of our Busy Work quilt......

Cutting Instructions

*Cut (4) 2 1/2 inch black squares for corners.
*Cut (2) 3 1/4 inch light squares - crosscut twice on diagonal for Quarter Square Triangles.
*Cut (1) 3 1/4 inch black square - crosscut twice on diagonal for Quarter Square Triangles.
*Cut (1) 3 1/4 inch brown square - crosscut twice on diagonal for Quarter Square Triangles.
*Cut (1) 2 1/2 inch black square - for square-in-a-square unit.
*Cut (4) 1 1/2 inch light squares for sq-in-a-square unit connector corners.

Piecing Instructions


1). Draw a diagonal line on the wrong side of the (4) 1 1/2 inch light print squares.  Place in a corner of the 2 1/2 inch black square and sew on the drawn line; press and trim.  Repeat for the remaining corners to make a square-in-a-square unit that measures 2 1/2 inches.

2). Sew Quarter Square Triangles together as shown to measure 2 1/2 inches.

3).  Arrange the pieces as shown and sew together into rows; press.  Sew rows together; press.

Block should measure 6 1/2 inches unfinished.


I just have to say how much I appreciate all of the comments I receive from you guys!! 


Tuesday, April 10, 2012

Little Red Schoolhouse


Several weeks ago, I showed you a preview of this quilt called

Little Red Schoolhouse

I'm so happy that this pattern is now ready!  This is the first of six new patterns I am releasing in time for Spring Quilt Market in Kansas City.  I've had lots of requests for quilt patterns featuring a Schoolhouse block, and I had lots of fun creating this block, and designing two quilts using it. 

The block is easy-to-piece with NO "Y" seams!  Choose an assortment of fabrics in two of your favorite colors and one lovely background to make this 27" x 27" wall hanging.  I used fabrics from Paula Barnes' Cotton Club, which I love.

Click here if you'd like to order the Little Red Schoolhouse pattern and I'll get it in the mail to you right away!

Thanks for taking a moment to visit with me.  I hope you come back again soon!

Pam

Monday, April 9, 2012

New Book! Civil War Legacies by Carol Hopkins


My friend, Carol Hopkins, has a new book just out called...

Civil War Legacies

I've been anxiously awating its arrival!  If you love traditional blocks and quilt designs using
Civil War Reproduction fabrics, then no doubt you've been a big fan of Carol's work
for many years.  Her new book features lovely quilts with loads of glorious up-close
photos of the quilts, and the yummy quilt fabrics.


This is one on my short list of to-do's!  It's called, Tomorrow, Scarlett, and oh how I love it!
Great fabrics and a fun, traditional block.....and my favorite color....RED!!
L O V E!!


And....oh yes...gotta make this one, too, called Hooker's Hat Patch
I have lots of that red setting fabric...hhhmmm...now where did I put it??   

As you can see, Carol's book has lots of color graphics, and great instructions to guide you
thru the fun of piecing her quilts. She's also included stories of how she
came to name the quilts in the book.  Love reading that, too!

Look for Civil War Legacies at your local quilt shop, or on Carol's website

This book is full of wonderful reproduction quilt patterns I know you'll enjoy.
It's a must have for your collection!

Pam

Friday, April 6, 2012

Pocket Patchwork~Busy Work~ Part Two


Welcome to block two of my Pocket Patchwork sew-along!  I sure hope you enjoyed making Block One.  Here's the next batch of info to continue with our Busy Work quilt......


Cutting Instructions

*Cut (4) 2 1/2 inch black squares for corners.
*Cut (2) 3 1/4 inch light squares - crosscut twice on diagonal for Quarter Square Triangles.
*Cut (1) 3 1/4 inch black square - crosscut twice on diagonal for Quarter Square Triangles.
*Cut (1) 3 1/4 inch brown square - crosscut twice on diagonal for Quarter Square Triangles.
*Cut (2) 1 7/8 inch black print squares for Half Square Triangles - Pinwheel.
*Cut (2) 1 7/8 inch light print squares for Half Square Triangles - Pinwheel.

Piecing Instructions

1). Draw a diagonal line on the wrong side of both 1 7/8 inch light print squares.  Match with black squares.  Sew 1/4 on each side of drawn line; cut apart and press to dark.  Sew into a Broken Dishes unit that should measure 2 1/2 inches.

2). Sew Quarter Square Triangles together as shown to measure 2 1/2 inches.

3).  Arrange the pieces as shown and sew together into rows; press.  Sew rows together; press.
Block should measure 6 1/2 inches unfinished.


Easy breezy blocks showcasing fun fabrics!  Thanks for sewing-along with me today!  Part Three next week!  See you then...

Pam

Monday, April 2, 2012

Kansas City March & The Legacy Sampler


At long last, I can finally tell you about a wonderful new project I have been working on, along with 15 of our industry's most talented Civil War Designers, for next month's Spring Quilt Market in Kansas City!!  We've been working on this project since last spring and have been bursting at the seams to tell you all about it.

The quilt above is a brand new block of the month!  It features 16 original blocks designed by the 16 participating CW designers. 


We've named the event


The pattern will be available to any shop owner attending spring market who visits all 16 of our booths and completes the March Passport.  They will obtain a stamp in their passport by visiting our booths and receive access to the complete set of patterns for this one-of-a-kind BOM sampler quilt!!    Click on the KC March link above for more information.

Here's the list of all of the participating Civil War designers and a look at the blocks they've designed.


Please visit my fellow designers' blogs for more news about the KC March
and to see all of their new market patterns as they are released!

Tara Lynn Darr

Celine Perkins

Evonne Cook

Sherri Falls

Annemarie Yohnk

Dawn Heese

Emily Hardwig

Deb Eggers

Joyce Weeks


What does this have to do with you as an individual quilter?  Perhaps this BOM is coming to a shop near you!