HomeMy WebsiteAbout mePocket PatchworkFreebie Patterns

Tuesday, March 31, 2015

Every Little Bit ~ American Patchwork & Quilting Magazine!!

If you're a fabric lover, fabric a-holic, and fabric scrap saver like me...do I have a fun quilt for you to make!!!
June, 2015 issue of American Patchwork & Quilting magazine
cover photo used with permission
I'm blessed to once again to have another original quilt design in the new, June issue of American Patchwork & Quilting magazine!!!  


Every Little Bit quilt, by Pam Buda of Heartspun Quilts
Appearing in the June, 2015 issue of American Patchwork & Quilting magazine
photo used with permission 
Photo used with permission of American Patchwork & Quilting magazine.
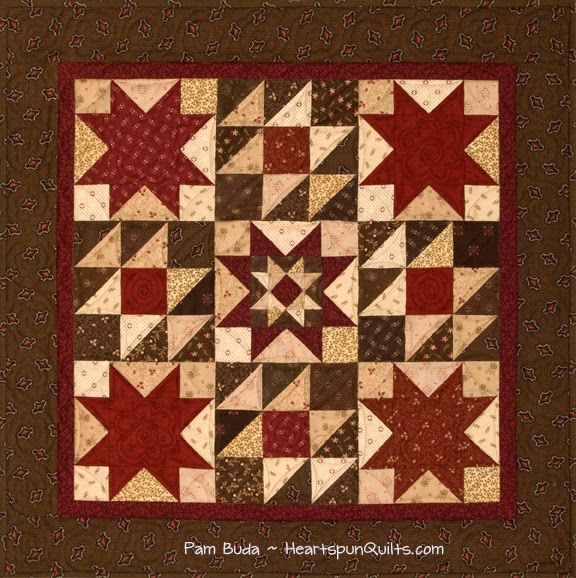
The quilt, called Every Little Bit, is aptly named as it really does use just about every little bit and scrap of fabric you may have!!  
Here is a close-up of one of the Churn Dash blocks.  The straight sides of the block are paper-pieced.  Now, don't be put off by that at all!!  Your fabric pieces can be fairly large when you are sewing with them....and...sewing them paper-pieced-style is easy because it's nothing but straight strips.  (Notice the little alphabet fabric print?  I jumped a line in the paper piecing in order to see more of the print.  You can do that, too, to fussy cut, or show more of a print if you'd like.)

Here's a photo I took while making the quilt, and I need to tell you that I worked on this quilt...on and off....for about a year.  

Trust me...you'll enjoy making the quilt a little at a time.  It could have been named "As Time Goes By" because you can paper piece and make the other units a little here and there as you come across scraps....because, of course, the scrappier the better!!
 Making this quilt taught me an important lesson.  Organize!!!  
Sorting the fabric scraps by color made picking and choosing the fabrics for each paper-pieced segment much faster and easier.  The key is to have some sort of organizational system in place, then while you generate more and more scraps, you can 'file' them for future use.  All of the fabric pieces stored in these containers are strips, or squares that measure less than 2 inches.

The beauty is you can use even the smallest little scraps...ones you might throw away, sewing those sweet prints into blocks, and make yourself a quilt of scrappy happiness!  

Every Little Bit was quilted by Linda Hrcka of The Quilted Pineapple
I was twice blessed in that the wickedly talented Linda Hrcka, of The Quilted Pineapple, quilted her magic into my quilt.  Please visit her blog to see more photos of the quilting.  If she hasn't posted about this quilt yet, she will very soon.

Now I know you have lots of scraps, and who doesn't love a classic Churn Dash block??  So the only thing left to do is run out to the store, and buy yourself a copy of American Patchwork & Quilting magazine.  It will be on the newsstand April 7th!!!

I have four orphan blocks leftover from making my quilt, and I think they need a good home. 

For a chance to win one of the blocks, please leave me a comment about how you organize your scraps, or what kind of scrappy quilts are your favorite.  I'll choose four winners Friday, April 3rd, and send you a signed block for your quilt.    

Happy Scrapping!!


Tuesday, March 24, 2015

Introducing Tokens of the Past: Spice Box Pattern Trio

I'm so, so jazzed to be able to finally show you the three new quilts included in my newest Tokens of the Past pattern, the second in the series, called Spice Box.

Here are the three Spice Box quilts....


Crimson & Cloves quilt designed by Pam Buda
This is the Crimson & Cloves quilt, and measures 24" x 24".


Ginger Snap designed by Pam Buda
This one is called Ginger Snap and measures 26" x 26".


Cinnamon Sticks quilt designed by Pam Buda
And, lastly, Cinnamon Sticks which measures 12" x 15"

You may have noticed that they all have names with spices in them, which was quite deliberate, seeing as how the pattern name is called Spice Box.  


I took the name from one of my favorite pieces of Treenware...this 'ol Spice Box.  Inside, there are seven cylindrical containers, all for different spices.  I just love it.
I just had to name the pattern after something in my Treeware collection.  After all, the quilts are all made from my newest fabric line, Treenware & Berries, for Marcus Fabrics!!

Just as before, all of the units and blocks for all three quilts can be made from just one Treenware & Berries 10 inch precut!!  

Just add border and binding fabric and you're on your way to three fun quilts!!

For a limited time only, I am once again offering you the Tokens of the Past: Spice Box COMPLETE KIT with FREE SHIPPING anywhere in the U.S!!!!  (If you live outside of the US, you will receive a $9 credit toward International shipping.)  Click here to order the complete kit.

If you'd like to order just the Tokens of the Past: Spice Box pattern, and the Treenware & Berries 10 inch precut only, click here.

You can also order the Tokens of the Past: Spice Box pattern only, or the Treenware & Berries precut only as well.  


Also available for your piecing pleasure are Treenware & Berries Fat Quarter bundles and Fat Eighth bundles.  They are also a Pre-Order item.  Click here to order Fat Quarter or Fat Eighth bundles.

All of these items will ship in April.  The moment they arrive here, we work diligently to get them processed and on their way to you!  

Because the Treenware & Berries precuts are only available in limited supply, your best chance to get a precut, or the kits, is to pre-order them.  Once they're gone, they're gone.

I hope you like the three quilts in the new Tokens of the Past: Spice Box pattern.  They were great fun to piece and will be a very nice addition to your collection.

Make time to stitch today....it will make you happy!
  

Saturday, March 21, 2015

A Prairie Gathering Quilt of the Quarter ~ Month Three

I can't believe it's already time for month three of our Prairie Gathering program!  My gosh, where has the time gone?  We made it through winter (I hope it's over now!) and spring is popping out all over.  

Your quilt center block should look like the photo above, and we're going to grow the quilt this month, add more pieces and sewn units to our zip bags for our pieced borders.  


The first step this month is to sew the four large setting triangles to the center block.  Take care here as that seam is one, very large bias edge!  The triangles are over sized, but if the fabric stretches out of shape, over sized pieces won't fix that.  

Once you have them all sewn and pressed, you have to trim the quilt center to 26 1/2 inches square.  Don't use the photo above as a guide for trimming your center square!!!!!  Your center may be larger or smaller than mine, depending.  Measure first, and if in doubt, draw lines with chalk, and your rulers, to see where you should cut.  

Measure the center seam and the top and bottom of the quilt center.  Turn a quarter turn, and repeat to understand exactly what size your quilt top really is.  The photo above shows the center block floating 1/2 inch from the raw edge.  Yours may be different!!  In order for all of the pieced borders to properly fit, it is imperative that your center block measure 26 1/2 inches unfinished.  You have a little wiggle room here, and it's perfectly OK to have your block "float" a little from the seam.  Your eye will see that the point is perfect, and will never notice that the point doesn't touch the seam once it's sewn.  

The next step is to add the first border.  I designed this deep red, almost red/black fabric to give depth and definition within all of the different reds in the quilt.  It has a very specific job to do.  This border is very small....only 1/2 inch finished, so be very careful, and take your time sewing it to the quilt center.  

That dark red print really pops, doesn't it??  

This month, you are going to begin making Flying Geese, and....
...Two Patches for your Checkerboard border.  I have been asked why piece the same color patches together for this border?  The answer is easy....for sparkle and interest!!  I could have chosen one red print for a plain border, but honestly.....when you add this border to your quilt, all the different reds, and variety of mediums and darks, will make it just sparkle, and it's a whole lot more interesting to the quilt.   Believe me....it's well worth the effort!!

The only other task you have left this month is to cut pieces for future borders and blocks.  Be sure to do a count of all of the pieces and sewn units you are supposed to have in your zip-bags.  You will find the tally for everything in your pattern instructions. 

Hey...that wasn't so hard, was it??  And, look how far we've come.  Your quilt is already 27 1/2 inches, and you have something pretty to hang on your design wall and enjoy.  I'll be back again next month, around the 20th, for more info as we take this journey together.  


As Quilt Market grows ever closer, I'm very busy preparing and designing new things for your piecing enjoyment.  Here's a little glimpse into what I've been up to, and some new things coming very soon.

The Treenware & Berries fabrics arrived late this week, and we immediately began cutting the quilt kits for all of you who pre-ordered them.  We're working to have those ship to you ASAP.  I'll email you when they're on the way!!  The patterns are all done as well, and will be on my website very soon.

My new Tokens of the Past: Spice Box quilts are very near completion.  I'm just binding the last two, and they're off for photography on Monday, which means they will be available soon as well.  

I will have another Tokens of the Past pattern debuting at market with 3 brand new quilts all featuring the classic, and timeless Nine Patch.  The pattern name is Tokens of the Past: Nine Patch Reverie.  This Tokens pattern is not linked to a specific fabric line, or pre-cut.  The Tokens series was always meant to have a variety of three, classic and fun quilts of whatever inspires me.  I'm love, love, loving the new Nine Patch quilts, and I hope you will, too!!  

The first round of strike-offs for my next fabric line have come and gone.  It's coming together very nicely, and I'm excited to share it all with you, but that will have to wait a little longer.

I am also formulating my ideas for a new sew-along.  This one will be completely different than anything I've ever done before.  You will get to see the quilt design before we sew....no mystery, and it may go on for many months, but will be some of the easiest piecing you've ever done!! Intrigued??  Oh, and did I mention it will be all stars??  

Watch my blog very, very soon for news about a new, original quilt design appearing in a national magazine! It's super, super scrappy, and I hope you'll like it!!

Don't forget that Lynne Hagmeier and I are traveling to Montpelier, ID this coming week, to The National Oregon/California Trail Center, for a series lectures/workshops, so if you're in the area, we'd just love to see you!!

I try hard to post sneak peek pictures of what I'm working on, and you can see them on Instagram and Facebook, so I invite you to follow me if you'd like.  

So, that's a little recap of  some of the stuff that I've been up to.  I do hope you find time to do something you enjoy this weekend....like a little stitching?!!  I'm going to try to do the same.

Friday, March 13, 2015

Blog Hop Winners & Treenware Quilted

Our Spring Thyme Blog Hop is over now, and we really hope you enjoyed it.  Did you find a few projects that inspire you?  I know I did, and I gained quite a few new recipes to try as well.

As promised, I have two lucky winners on this "unlucky" Friday the 13th.  They are....

Anonymous, who posted......Pam, thank you for the lovely pinkeep pattern and yummy salad recipe. Can't wait to try them both. the Union Forever fabric is awesome - is it still on the market for purchase. Thank you so much for all your wonderful tips and all you bring to the quilting community. Here is Michigan the weather is slowly creeping into the 40's - Spring is on the way!! Take care. Dolores

Dolores, to answer your question about the Judie Rothermel fabric, it may still be available at your local quilt shop, but is at least 2 years old.  Happy hunting.

and....45th Parallel Quilter, who posted.....

Lots of quilting and sewing accomplished this winter. Northern Michigan is known for its cherries so I definitely will be trying that salad ... thanks for sharing! Pinkeep is adorable and would make the perfect Christmas exchange gift for my guild dinner ... thanks for the instructions! Thanks also for the contest ... always fun! Linda

Congratulations to the winners!!  Please email me at Pam@HeartspunQuilts.com, and I'll send your leather thimble dots and perfect patchwork pins out to you right away.  Hope you like them!!

And my heartfelt thanks to everyone who took the time to leave a comment.  I thoroughly enjoyed reading every one, and hearing about where you live, and what you're stitching on.  Thank you so much!!


Treenware & Berries by Pam Buda using the Treenware & Berries fabric collection for Marcus Fabrics
My Treenware & Berries quilt has just come back from my friend and quilter extraordinaire, Ronda, who worked her incredible magic quilting my quilt.  I will be stitching binding all weekend (woohoo!!) so it's ready for photography Monday morning.  

I thought you might enjoy seeing more pictures of the quilting designs she chose for the quilt.


Hope you enjoy your weekend.  Spring finally arrived here in Chicagoland, and we're enjoying every lovely moment of it.  And, I hope you find time to spend with needle and thread.....Pam

Monday, March 9, 2015

Spring Thyme Blog Hop!

Welcome to my day of Buttermilk Basin's Spring Thyme Blog Hop!  I'm so glad you're here!

Most of us have been living through a dreadful winter that just keeps on going.  We're SO ready for Spring Thyme, aren't we??!  It's been nice to visit each designer's blog to bring a little Spring into our lives.   

I'm betting your anxious to get to my Spring project...so I won't keep you in suspense any longer.  


Patchwork In Bloom Pinkeep 


Pastel colors just don't live at my home, so I chose to create my Patchwork In Bloom Pinkeep to match the colors of my kitchen.  Of course, you can certainly choose to make yours in any colors you'd like, for where you want to display or use your pinkeep.  

Making it is very easy.....

Begin with the patches.  It's fun to choose some sweet prints you can fussy-cut to make things a little more interesting.  They're happy, little surprises in your projects.


The Union Forever print by Judie Rothermel for Marcus Fabrics
I adore this little red 'The Union For ever' print, and try to fit it into as many projects as I can.  
Fussy cutting can be tricky sometimes, and I want to keep every little scrap I have of this fabric, so I used my Frixion pen to outline the design area I wanted, and add the seam allowances.  When I was happy with the position of the center design, I cut it out.  The Frixion pen is great because any heat (iron), or friction will remove the ink, so you can draw again, and again if need be, to get the design exactly where you want it without cutting into the fabric.  (Frixion pens are available at your local quilt shop and some office supply stores.) 

Sew your patchwork top together.
Add a pretty fabric for the bottom of your pinkeep.  


I chose to use red twill tape to add a little splash to my pinkeep.  You can use ribbon or any other fun embellishments you want.  I used Roxanne's Glue Baste-It (love that stuff!) to tack the ribbon in place before sewing it.  


I used blue thread and big stitches to sew my twill tape to my pinkeep.  The Roxanne's glue allowed me to keep the twill tape positioned exactly where I wanted it to be with no pins in my way.  


Sew your pinkeep together.  Using pins meant specifically for patchwork will aide greatly in keeping your seam allowance accurate.  See how flat the fabric lay even with pins in there! They're the greatest!!  If you'd like, you can order these pins here.  Turn and stuff your pinkeep.


Add a little wool flower, and some cute buttons, and you're all done!  That was pretty easy, right?


And here is where my Patchwork In Bloom Pinkeep lives, in an antique dough bowl, on my kitchen island.  It makes me happy!  

Click here for the Patchwork In Bloom Pinkeep pattern.  


As salads go, the usual garden salad with bottled dressing is a ho-hum for me.  I love a salad with inventive ingredients and home-made salad dressing.  This one is a favorite in my house.  If you don't like dried cherries, you can substitute dried Craisins, dried blueberries, or pop in fresh fruit.  The salad dressing is oh- so yummy with a hint of maple syrup.  It makes a fabulous pairing with the salad ingredients.  I hope you enjoy it as much as we do!  

Click here to print the recipe.


Those wonderful patchwork pins are a must have for me now, as well as a new notion (new to me, anyway) my friend Deb gave me.  The little thimble pads are just great when hand sewing. I hate wearing a thimble, but there are times you just have to have one on.  These little leather pads stick to your finger, giving you the protection you want without the feeling that you're wearing a giant bandage.  Click here to order Thimblepads. 

I have a few extra packages of these little goodies to give away!!  Leave me a comment about how you've been surviving your winter (including those of you in warm climates!), and what you plan to sew in the spring.  I'll chose two winners on Friday, March 13...lucky Friday the 13th!!!

I'm so glad you stopped by my blog for a quick visit.  My thanks to Stacy West of Buttermilk Basin for coordinating our Spring Thyme Blog Hop!  Hope you're having as much fun as we are.  

Be sure to visit NotForgotten Farm tomorrow!!

Sending a special thank you to Charlotte S. in California, for her kindness and inspiration.  


Wednesday, March 4, 2015

Pre-Wash or Don't Pre-Wash?? That is the question!

You may have noticed that lately....I have a few red quilts out there.

And there are lots and lots of pretty red fabrics in your local quilt shop.

I have received more than a few emails asking about whether or not to pre-wash all of this red fabric.  

Do I pre-wash?  Is it safe?  Will the dye run??

That is an age old question, and I thought perhaps, with all this red fabric out there, that I should address this question.


First, let me share what I do.  I don't pre-wash anything.   
If you'd like to pre-wash...go right ahead.  There are exceptions to that rule, however.  I don't recommend pre-washing quilt kits unless you know for certain you have plenty of fabric.  Also, I wouldn't pre-wash precuts like 5 or 10 inch charms, or jelly rolls, and the like.  Many of the patterns using them use every inch and every thread, so you don't want the shrinkage that comes with pre-washing or you may find yourself short of the needed fabric.  

I don't pre-wash because I like the sizing the fabric has when it comes off the bolt.  When I'm about to work with fabric to make a new quilt, I add starch or sizing to my fabrics before cutting them!!  

Having stiffer fabric to work with aides you in many ways throughout the piecing process.  Because the fabric has more body, it behaves better thru cutting, piecing, and pressing.  To me, working with washed or un-sized fabric is like trying to style your hair with no conditioner or any helpful hair care product.  No mousse, no gel...just limp, unconditioned hair.  (You wouldn't want to see my hair without that stuff!!  Eeekkk!!)  Sizing and starch give the fabric a lot of body, and the difference is amazing!

But...what about the red dye??  If you wash the quilt without pre-washing the fabric, will the dye bleed and ruin your quilt?  

The answer to that question is.....with quilt shop quality fabric from a major, well-known manufacturer, you should not have any problem.  You would not need to pre-wash any fabric.

That said, when in doubt, TEST!  Test some swatches for yourself to be sure.  No manufacturer gives a guarantee because so many factors are at play.  What type of water do you have?  Hard, soft, well water?  How does it mix with the detergent you're using?  Any number of things can be happening, and because a fabric company has no control over that, they cannot give a guarantee.  But honestly, I trust the quality of really good quilt shop quality cotton.  

Does that make you feel any better?  Maybe...a little.  That's not good enough!  So, I did a test with one of my quilts so I can share the results with you.  
 The quilt above is the bonus project included with my Prairie Gathering Quilt of the Quarter program.  It's made of all the same red prints in the Prairie Gathering fabric collection.  The fabrics were never washed, but were heavily starched, then cut up, sewn and quilted.  The quilt has never been washed.....until now!  Notice I will use my everyday detergent and not a mild quilt soap.  I wanted to see what would happen when I washed it.  
I added a color catcher to the wash to see if it would pick up any dye that was released into the water during the wash.

It has loads of suds!
 This picture shows the quilt still wet and what the color catcher looked like when it came out of the washer.  It's really clean and clear.  
 Here you can see a close-up of the fabrics still wet.  The red dye has not run at all.  
This is a close-up of the quilt center after drying the quilt in the clothes dryer.  The quilt has that nice crinkle to it (LOVE that!!) and looks great.  

I hope this helps you feel more confident in using Marcus Fabrics.  Again, when in doubt, please test for yourself.  

The folks at Marcus Fabrics have a bit more to add on this subject on their blog today.  So, click here to visit the Marcus blog and read a bit more about this.  

Have you been Blog Hopping with us??  Our Spring Thyme Blog Hop has just begun!  Be sure to check out all of the designer's blogs for a free spring project, inspiration, and a yummy recipe.  Click here to see the full list of designers and the schedule.  

And, please return right here to blog on my day....MARCH 9th!!