



HomeMy WebsiteAbout mePocket PatchworkFreebie Patterns

Showing posts sorted by relevance for query starch. Sort by date Show all posts

Wednesday, August 14, 2019

About Starching Your Fabric

Lately, I've had more than a few inquiries about how I starch my fabric.  I have been doing so for at least 15 years now and can't imagine piecing without starched (read stiff) fabric.  The difference is amazing!

Truth is I use Magic sizing instead of starch.  It's inexpensive, readily available (.94 at Walmart), has no odor and works like a charm.

People ask me what I think about Best Press.  I like it!  
It's a bit expensive for the amount of starching/sizing I do, but if you like it, it works well.  It doesn't get the fabric as stiff as the Magic sizing does, which you may prefer.

Why bother starching or sizing?  I use this analogy....
would you rather piece with tissue paper or card stock?
Which would go where you want it to go?  Which would give you more control?

Card stock, of course!  

You will notice a difference when cutting, pressing and piecing for sure!  

Two caveats!  

One......Be sure to starch or size your fabric before cutting it!!  I don't recommend starching already cut or sewn pieces as they can shrink or warp.  

Two.....don't starch or size precuts.  Same reason...they will shrink a little bit and you likely need every thread you have of a precut.
I lay a old beach towel on top of my big board ironing board so it will soak up excess sizing.  Be sure to thoroughly spray....thoroughly saturate your fabric.  I don't just lightly mist it...I saturate it!  The photo above shows partially dry fabric on top to show the difference.  
I usually fill the ironing board with fabrics close together so as not to waste sizing.  
I let the fabric rest, especially if I will be ironing it dry right away.  I pile like-colored fabrics together.  This allows the sizing to permeate the fabric fibers so I won't get any flaking.  Flaking happens because the sizing is basically sitting on top of the fabric and the hot iron cooks it which causes the flakes.  If you're going to allow the fabric to air dry, resting is not necessary.
 
Most of the time, I hang the fabric on a drying rack and allow it to air dry so I can go on to do something else.  The sizing does not drip on the floor...so no worries about that.

Once it's dry, steam iron the wrinkles out.  If a wrinkle persists, give it a little spritz with the sizing and that will take care of it.  Then, you're ready to cut!

Often, I am sizing scraps.  These fabric squares are actually from a pack of 3.5 inch squares....a precut if you will.  I know it's ok to size them because they are larger than what I need to work with, so the little bit of shrinkage is ok.  

With scraps, I try to group them tightly together when sizing them and for pressing.  That way the iron is touch multiple pieces as I move it around.  It goes pretty quickly.

I hope this gives you an idea of how to starch or size your fabric.  It took about 15 min to spray the fabrics this morning and hang them.  Then, I went on and began sewing and doing other things.  By noon, the fabrics were dry.  I will iron them when I have a chance and they're ready for cutting.  It doesn't take much time but the results are huge.  

Don't believe me?  Make one block and give it a try.  Starching/sizing help to prevent stretching, you won't have stringy fabric either, and oh...the control!   The smaller the pieces, the better it is!  Experiment with sizing or actual starch to see what level of stiffness you prefer.
Once the quilt is done and washed, all the sizing and starch are gone.  Actually, the fabric becomes softer and softer the more you handle and piece with it.

I have also begun spritzing my pieced units and blocks with Best Press.  (I can because I size my fabrics before cutting.)  You can read about that here.  

I'm off to Iowa in the morning.  I'm teaching at The Little Red Hen Quilt Shop.  Click here to read about the classes I will be teaching Friday and Saturday.  Come join the fun!

Monday, November 8, 2010

Hand Applique by Machine ~ Lesson Two

Ready for the next step?  Here we go...

Turning the Seam Allowance
You'll need a few basic tools as shown in the photo above.  Gather the following items:

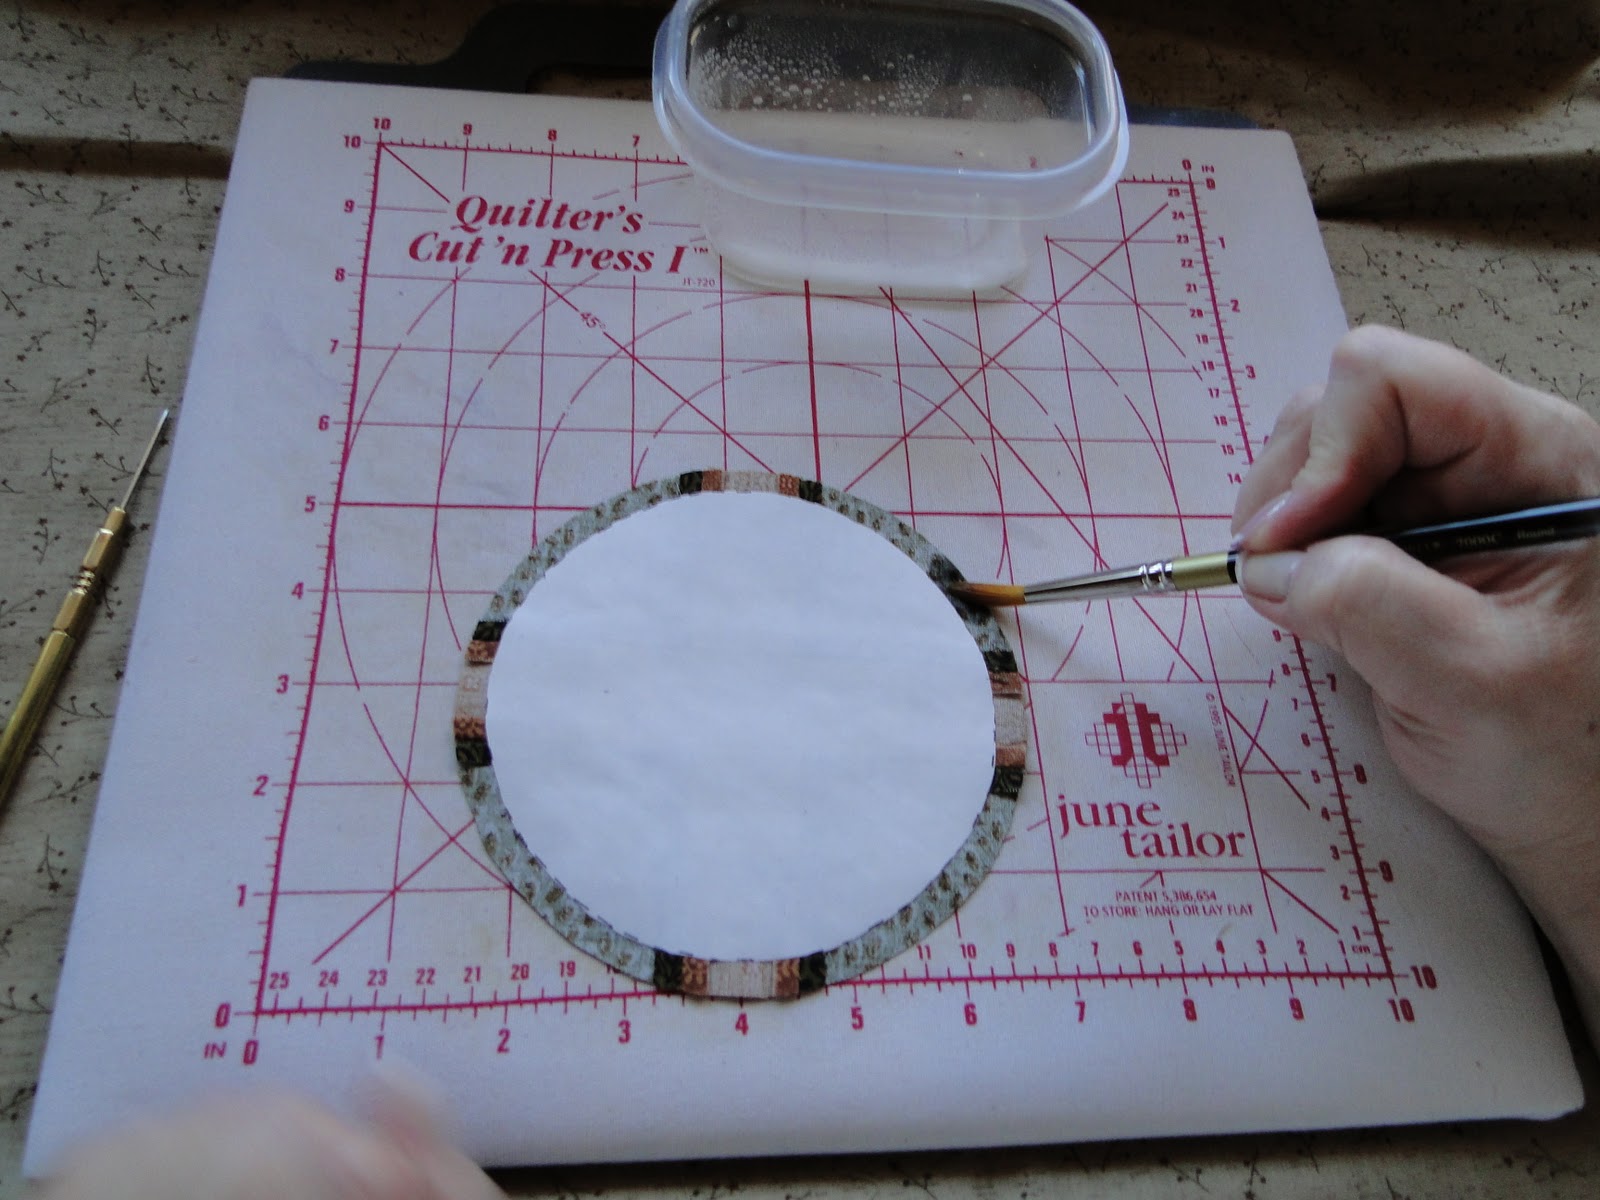
* A pressing surface.  I use the June Tailor Cut 'N Press because I like to work on the appliques at a counter in my sewing room, but your ironing board will work as well.

* A small container.  A deli container works nicely, or whatever you have handy.

* A can of spray starch.

* A brush.  This should be a natural bristle brush because a nylon brush lets the starch just run out of the bristles.  A natural bristle brush holds the starch, then releases it evenly.  I use a Lowe-Cornell number 8 round brush (which is actually tapered nicely at the tip).  They are about $10 at Michaels.  Use your 40% coupon!  It's worth it!!

* A Clover mini iron.  You may wonder about this iron, but it really is necessary.  You can try to use a regular size iron, but you'll struggle with it and it just doesn't work well.  It's worth the investment.  Your local quilt shop can get this item for you.

* A Stiletto.  Also very necessary.  Don't try to substitute using a seam ripper or bamboo stick.  They just don't work.  Believe me, I've tried and many of my students have tried.  Your quilt shop can get this also.

Five simple items are all you need for this technique.  It's a small investment for the tools, but remember you'll have them for years.  But first....read on to see if you like the technique!

Spray some starch into the container. 


Begin "painting" the starch onto the seam allowance.  It's very important that you try to keep the freezer paper dry.  It's not a tragedy if you wet it some, but try not to.  The freezer paper needs to be dry and stiff so it can form your applique shape.  You can paint as much of the seam allowance as you want.  I generally keep a couple of inches wet ahead of where I'm working.


Using your stiletto in your left hand, bring the seam allowance over the freezer paper.  This will feel weird....all thumbs at first.  Practice a bit.  It becomes second nature in no time!  Promise!


While you're holding the seam securely in place with the stiletto, bring the iron just to the area you've folded.  Hold it there until it's dry.  When dry, the starch will keep the seam folded over.


Continue working around the entire circle, adding gathers in the fabric when needed.  If you get points, peaks, and divots, don't worry!  Just wet them with the starch and use your stiletto to smooth them over, then repress them dry.


 Your applique will look like this when it's finished.

Now, here's the best part!  When you're ready to stitch the applique, remove the freezer paper before stitching it in place!!  Yes, before stitching!  This is why I love this technique.  I don't want to be fooling around with cutting the back of the block/applique after stitching.  I don't want to submerge my work in water to get the paper out!  No need with this technique. 

The seam allowance stays folded.  Now, I can stitch by hand if I prefer, or by machine.  I've done both.  The applique itself is soft and pliable, just like needle-turn would be. 

Stay tuned for the last lesson.  I'll show you how to stitch your applique with your machine so it's barely visible.   Please let me know what you think so far? 

As with any new skill, practice makes perfect.  If you're in the Chicagoland area, I will be teaching this technique in a workshop on March 26, 2011 at The Quilt Merchant in Winfield, IL.  I'd love to have you join us!

*~*~*~*~*~*~*~*~*~*~*~*~*~*~*
I wanted to answer the question about stabilizer....there is no need for a stablizer as the freezer paper is, in essence, a stabilizer.  The freezer paper is also wonderful in that you can mark your pieces, make notes, arrows, etc, to aid you in assembly.  Remember, too, that if things aren't working out with a particular piece, you can always remove the freezer paper, press your fabric and start over!  I encourage you to try this and practice a bit.  The learning curve isn't bad a all!

Sunday, August 13, 2017

Quilting Essentials ~ It All Begins With The Fabric

Every quilt project begins with the fabric.  After choosing (or being possessed to make) a quilt design, the next step is gathering just the perfect fabrics for that quilt.  

I can not over state the importance of using quilt shop quality fabrics for your quilt.  Quilt shop quality fabric simply means the base fabric itself, called greige goods (pronounced gray), are 100% high quality cotton threads in high thread count.  You can tell the difference when you hold it up to the light (as compared with chain store fabric), and in the "hand" of the fabric, which means the soft, smooth feel it gives when running your hand across it.  AKA petting said fabric.  Teehee!  

Additionally, the dye used, and the printing manufacturing process produce fabric that are not likely to bleed, fade, and will last much longer to wear & tear and washing than lesser quality fabric.  Quilt shop quality milled fabric are long lasting, quality goods produced specifically for quilting, and sold only to quilt shops for that reason.  If you're going to invest your most precious resource into your quilts....your time....why short change yourself with lower quality fabrics?  (in my humble opinion.)


To Wash Or Not To Wash?

I believe this to be a personal preference.  I thinking it's fine and dandy if you want to wash your fabric before cutting into it.  Personally, I don't wash mine.   The reason is that when fabric is milled, sizing is added to it for body, to keep it smooth, and to keep it from wrinkling. Once I have it at home, I add a lot more sizing or starch (mostly sizing) to make it even more stiff.  

I am a big believer in sizing fabric!!  The proof is in the results you get and I feel strongly that it's worth the time.  There's a whole lot of designers and quilters who have come to know the benefits of sizing/starching fabric....a lot more than you might think.  More on this in a moment.


A few years ago, I wrote a blog post about washing a quilt that was made with unwashed, and sized fabrics.  (Click here to read the original post.)   

Red fabric being one of the most notorious for bleeding, I did an experiment with this little quilt made from my A Prairie Gathering collection.  I sprayed the fabrics with sizing, soaking them thoroughly, then ironed them dry before cutting them for the quilt.  If a fabric is going to bleed, it will surely bleed with sizing the same as with plain water.  I tossed this quilt into the machine using the same detergent I use to wash our clothes.  I wanted to see if any of the reds would bleed into the lights, or onto the backing.  I'm happy to report that not one fabric bled. You can see photos of the experiment results in the original post.

With today's colorfast dyes, and milling process, fabrics generally do not bleed or run like they did years ago.  That does not mean it never happens! If you have any doubt, it's always a good idea to test a patch so you'll know for sure.

Why add sizing or starch?

One word.....Control!

Washed and unwashed fabrics are soft and pliable.  They fold and bend easily which is not a good thing for piecing.  Imagine piecing a block with tissue paper, then imaging piecing with card stock.  The stiffer the fabric, the more it behaves, and the more control you have to make it do what you want it to do, stay where you want it to stay, which means controlling it as it moves through the needle on your machine.  


You must, must remember....starching or sizing must happen when your fabric is still yardage or scrap - BEFORE  you cut it up for your quilt!!!!  

If you didn't add sizing to your yardage before cutting, 
do not spray your cut pieces, or blocks with starch as this will shrink or warp your fabric.  I also don't recommend spraying any pre-cut, charm pack, or 10 x 10 pack, to guard against shrinkage. 

You will notice a difference with the control you have in cutting your fabric, big time with piecing with your fabric, and you'll get a beautiful press with stiff fabric.  If you don't believe me, just try it with one block!


I have an entire chapter all about fabric preparation, sizing, and even a way to starch yardage in your washing machine in my Heartspun Quilts Hint & Tips book.  Click here for more info on the Hints Book.

All of the above fabric preparation is the way I do things and is just my opinion.  I know it has helped many people gain great results in their piecing experience, but certainly isn't the only way to do things.    If what you're doing yields good results for you....if it isn't broken...don't fix it!  


Wednesday, I am headed to Primitives of the Midwest in Missouri.  I haven't traveled for work in a year, so I'm very excited to get back to teaching, meeting wonderful quilters, and making more memories.  Check Instagram and Facebook for pictures while I'm on the road.

Be well....and keep your sewing machines humming!


Friday, November 22, 2019

Quilt Archaeology ~ Old Fashioned Christmas ~ Week 1

Let's get started!   Read all my hints and tips below before cutting.

From your light print: Cut (9) 2 7/8" squares.  Cross cut them once diagonally.
Also cut (14) 2" squares 

From red print #1: Cut (7) 2 7/8" squares.  Cross cut them twice diagonally.
Also cut (14) 2" squares.

We have only one block to make for our little quilt.  It's a pieced Flying Geese unit, and as with all Flying Geese, the accuracy of the block will depend on accurately cut and sewn pieces.  The angles will make or break your block.  So...I'll walk you through all my hints to make those blocks the best they can be.

Before you begin cutting and sewing, I highly recommend that you starch or size your fabric yardage!!!  The benefits are many for the time you invest.  You can read all about how and why I spray my yardage with sizing before beginning every project.  Click here to read my blog post all about starching/sizing fabric.


Our first task....making Half Square Triangles.  We're making them larger so they will be trimmed to the perfect size.  I do this for each and every HST I make and have been for more than 15 years.  You can't beat the results!  This is my favorite way to make HST's.  If you prefer another method, go with it!


Draw a diagonal line on the wrong side of the (14) light print 2" squares.  Match each with a red print 2" square.  Sew 1/4" on both sides of the drawn line.  Cut apart; press to the red print.  You'll have (28) HST.

Trim your Half Square Triangles to 1 3/8" square.  (Photo is before trimming)
My preferred method of trimming HST down is with a Bloc-Loc ruler.  The cut-out channel in the ruler accommodates your seam allowance so the ruler "locks" on to the seam to keep everything tight and the ruler does not rock back and forth.  It's easy to read and makes trimming super fast. You can read more about them and order one here.
Accurately crosscutting squares diagonally once or twice is far more important than you may think.  This applies to any task where you crosscut squares like setting and corner triangles.  It is VERY important that you cut perfect pieces.  The Creative Grids ruler above, which is one of my all time favorites (3.5 x 12.5), is my go-to ruler for crosscutting.  In the photo above, note the black arrows pointing to the 1/2 inch gritty area on the ruler.  That 1/2 inch of grip really holds the fabric in place so you get a very accurate cut.  The 1/2 inch grit is on almost all of the newer Creative Grid rulers, so while you may not have this particular size, look to see if you have a square ruler with this wide grip.  Anything you can do to keep the ruler in place while you cut is important.
Position the ruler so it's on the very point of the square.  These are the angles I referred to earlier that are so important for success with your block.  Be certain that you cut the 2 7/8" square to a perfect 2 7/8" square.  Position the ruler on the very tip of the points.  Press down on the grit of the ruler to hold the fabric in place and cut. (Press hard on whatever ruler you're using.)  I can't emphasize this enough...crosscutting has to be perfect!!!  Personally, I never stack fabric when I crosscut afraid things will move underneath.  If you'd like my favorite Creative Grid 3.5 x 12.5 non-slip ruler for yourself, you can order one here.
If your ruler moved and you have a tiny 'squared' tip (see arrow above) - my advice....do not use any piece from this square.  The angles of all of the triangles are not correct and your block will likely be imperfect.  This is the main reason for trouble with pieced Flying Geese.
Arrange (3) Half Square Triangles and (3) red print triangles as shown above.  
Piece the units into rows; press.   I pin my pieces with my Fine Patchwork pins to keep those pieces in perfect alignment.

Because I treated my fabric yardage with sizing before cutting, I can spray starch or sizing anytime in the piecing process.  I do this as I press each unit and block.  Stiff fabric/units/blocks give much better control which is always welcome, but even more so with these small pieces.  I use Best Press with the fine mist pump while piecing.  Read more about it here.
Sew the units together; press.
Take good care and crosscut the light print 2 7/8" square once diagonally.  

Sew (2) light print triangles to the previous unit; press to the light triangle.  

This is where the Seam Align Glue and Fine Patchwork Pins really help a lot.  Just add a tiny dab of Seam Align Glue to both the light and red triangle points to keep them together as you sew!  (See white arrow in photo above.)  It will help to sew slowly and take your time.  Sew a nice, straight perfect 1/4 inch seam.  You will be rewarded for your effort!  
Repeat these steps to make a total of (9) red print #1 blocks measuring 2 1/2" x 4 1/2" unfinished.

Done until next week!  So....did you pick up some helpful tips?   Taking the time to starch/size your fabrics, cut them accurately, check and double check measurements, and use all the tricks you can will help you not only with this pieced Flying Geese, but with everything you do.  You can find a lot more of my favorite tips, tricks and hints in my Hints Book.  Read all about it here.

I want to take this opportunity to thank everyone for your support and for your business throughout the year.  Now that I won't be traveling as much, I have more time to do fun things with you!  Sounds good to me.  

Monday, April 29, 2019

Circa 1880 Nine Patch Blocks

When I give trunk shows and teach workshops showing some of the really small quilts and blocks I have made, I hear people saying they could never make a block that small.  

Sure you can!  There was a time not so long ago when I didn't think I could either.  I learned several things really help.

You may start by piecing two small squares but those two squares quickly become three squares, and then they become rows, and then blocks.  Try one!  Blame me for your new addiction.

Starch.  I have been singing the praises of starching or sizing your fabric yardage for years.  It changed my piecing life playing a huge roll in improving my accuracy.  How would starch improve accuracy you ask?  Stiff fabric gives you waaayyyyy more control, and if your fabric goes or stays where you want it to, well....it turns out perfectly.   Honestly.  Cross my heart.

Pins.  No one ever tells you that there's big differences with pins and sewing needles.  Big differences!  Big, thick pins distort fabric.  How could they not?  In a pinch, you can use them to build a home!  No matter the size of pieces, blocks or borders you are sewing, and especially small pieces, using the right pins make a huge difference in accuracy!  
Several years ago, Clover came out with fine patchwork pins.  At last!  A pin made specifically for piecing patchwork of any size.  These pins are thin and glide into fabric like butter.
As you can see, they don't distort the fabric at all.  It lays just as flat as if no pins were there.  You can sew over them and they won't break a machine needle.  I can no longer sew piece without them.  And, with the Circa 1880 blocks, they keep even the smallest pieces in place.  Ask for them at your local quilt shop or order them here.  

You can also find lots more information on fabric starching and much, much about everything quilting from fabric prep to how I make my labels, in my new, revised Hints, Tips and Secrets book.  You can order one here.  

Wishing you happy stitches..... 

Monday, September 26, 2011

Hexagon Tutorial ~ Part One

Hexagon Supplies

I am very happy to report that my hexagon quilt is now in the hands of Ronda, my very talented friend and most excellent quilter.  Before I took the quilt top to her, I did take a quick photo so I can show you how it's progressing.  Drum roll please...........

PWSC J3 - Elizabeth's Prairie Garden
This is the first project I've ever made using hexagons and I have to say that it is something I know I will do for the rest of my life!  Those hexies are sooo cute and addictive!!  Nearly every fabric I encounter I think would make into an adorable hexagon, so I have a constant running pile of fabric squares ready to work on.  It takes only a few minutes, once you get the hang of making them, and before you know it, you've made enough to begin sewing them together.  And.... just as everyone always says, they really are the most portable little project!  A small bag of fabric squares, hexagon papers, needle, thread and scissors equates to many hours of sewing time. 

So...let's get you started making hexies!


English Paper Piecing

Here are my recommendations for basic supplies: 

Fabric swatches, hexagon papers, needles, general 50 or 60 weight sewing thread, silk thread, applique pins, Thread Heaven, thimble, needle threader, and either tweezers or hemostats. 

There are lots of opinions about the "right" supplies to use.  I will share my favorites with you and why they work well for me.  You may have a different choice and that's just fine.

Hexagon Papers
I looked into many of the available template & paper hexagon options and chose to work with pre-cut papers by a company called Paper Pieces.  There are many great options here and like so many quilting techniques, all are good....you just have to decide which is the right one for you.  I didn't want to spend my time cutting my own papers...I wanted to spend it sewing.  I chose to buy mine from Paper Pieces because they came in a wide array of sizes and pieces in the package and are very affordable. When choosing yours, one thing I would make sure of is that you can fold the sewn hexagons in half.  This was crutial for me when piecing them together.  More about that later.

Hexagons come in a wide variety of sizes and the size refers to the measurement of one of the six sides of the hexagon, not the width.  I chose to work with a 1 inch hex, which measures about 1 3/4 inches across.  The size was large enough so it would be easy to handle and shows a nice amount of fabric.  I also punched a hole in the center of my hexagons (before sewing them) so it would be easier to remove the papers when it was time....glad I did that, too!  Paper hexagons are available at your local quilt shop and at http://www.paperpieces.com/ 

Fabric
It's no surprise that you'll want to use 100% cotton fabrics, but depending on the size of the hexagon you're making, and the project itself, you may want to choose certain types of prints.  If you're making really small hexagons, then you'll want to choose small prints.  When making my quilt, I stayed away from tone-on-tones that read one color and looked for fabrics that had a cute print or multiple colors.  If I were making a large super scrappy quilt, then I'd probably use anything and everything. 

Regular readers of my blog know that I love to starch my fabrics before cutting them, but I don't recommend using starched fabric when piecing hexagons.  I did piece several with starched fabric and it was harder to push the needle through the fabric.  Not so bad when you're sewing one or two, but awful when sewing a couple of hundred!  I got great results without the starch.

Thread
I recommend using two different threads - one for making the hexagon and a different one for piecing them together.

When sewing your hexagon around the paper, use any regular or unwanted (rarely used color, etc) 50 or 60 weight thread!  All you're doing is basting the fabric to the paper (thus takingon the hexagon shape) so the thread will never be seen.  It won't be removed either.  So...empty your bobbins, use odd colors, buy whats on sale. 

When sewing your hexagons together, I highly recommend using silk thread.  Silk thread is strong and very thin.  Your stitches sink into the fabric and are nearly invisible. This is very important as you don't want your stitches to be seen on your quilt top.  I use it for needle-turn applique as well.  I like using YLI silk thread (although there are many good brands out there) and have it in two colors, although it's available in a variety of colors, but I don't think it's necessary to purchase lots colors.  My favorite colors are taupe #235 and black # BLK.  I pieced all of my hexs together using just the taupe color and it worked just fine.  Silk threads are a bit pricey, however, a spool lasts a long time.  For example, I made 72 needle-turn basket blocks and pieced more than 200 hexagons before I emptied one spool.  There are some pitfalls to be aware of when sewing with silk thread and I'll help you thru those in future posts.

Use a single strand of thread when sewing the hexagons around the paper and when piecing them together.

Needles
When you're sewing the hexagon around the paper, use whatever needle feels comfortable to you.  At this point it's not as important to pick a particular needle.  For general use, my favorite needle is an embroidery needle, size 8, by Piecemaker. 

When sewing your hexs together, it's very important to have the proper needle.  Choose a small needle (small in diameter not necessarily length) that will pierce a small hole for tiny stitches and work well with the silk thread.  There are many types that will do this.... straw needles, milliners needles, and my personal favorite.... an applique needle, size 10 Gold'nGlide (gold eye) by John James.  Try them until you find the right one for you!

Once you find a needle you like, I do recommend buying a package or two because your needles dull from use against the papers.  You'll notice when it's a bit of a struggle to sew and you'll want a new sharp needle. 

Thread Heaven
Thread Heaven is a wonderful helper with any type of thread.  (It's the little blue square in the photo.)  It's filled with a substance that coats your thread so it's less likely to knot and tangle.  I use it on most every type of thread, but it's very important to use it for the silk thread which wants to twist and tangle more than cotton thread.  I've never had a problem with silk threads tangling since using Thread Heaven.  It's very inexpensive (about $4) and lasts a very long time. 

Applique Pins
These pins are very short pins made to stay out of your way when appliqueing.  You can use a regular size pin when sewing your hexagon around the paper, but the shorter applique pins lessen the chance your thread will become hooked on it.  Another inexpensive tool that will last many years! 

Thimble
I'm not a person who sews with a thimble very often, but I guarantee you will need a thimble when piecing the hexs together!!  I tried sewing without one for awhile and had a nice hole in my finger to show for it.  Invest in a comfortable thimble.  That doesn't necessarily mean lots of money.  My favorite (and only) thimble is the leather one shown in the photo (the other one is an antique).  It's soft, nicely broken in and costs around $5.

Needle Threader
This is an optional notion.  Technically, you don't need to have one, although you probably have several lying around.  We will use this when I show you a great hint about working with silk thread.

Tweezers or Hemostats
We'll use either of these to easily remove the papers from our hexagons. 


Gather your supplies and get ready for my next post where I will teach you how to sew the fabric around the hexagon.  Please ask for all of these supplies at your favorite quilt shop!  They are usually happy to order whatever items you need.

If you have an alternate method of making hexagons and would like to share your technique or a favorite notion or hint/tip you use when making hexs, I invite you to leave a comment!  That way, we can all share in your knowledge!

Oh....and one more thing.....my hexagon quilt isn't quite finished!  No, I'm not talking about the quilting!   I'll still be adding a thing or two, so stay tuned and thank you for visiting with me today.  The next step in making hexagons is coming soon.

Pam

Friday, July 16, 2021

Teeny Tiny Quilt Club Begins Today!!

 Welcome to the first project in my new Teeny Tiny Quilt Club!

Teeny Tiny Stars Quilt by Pam Buda of Heartspun Quilts
Teeny Tiny Stars is our first project.  I adore star blocks, so I just had to have a tiny star quilt be the first.  Quilt size is approximately 7 x 9 inches.

How will the club work?

Anyone can participate, and I sincerely hope you all do!  Afraid of tiny pieces?  Perhaps this is the project to give it a try?  I'll share a tip or two as we piece this project over the next few weeks, so yes....it's a sew~along.

Click here to download the Teeny Tiny Stars pattern for a nominal fee.  

You can begin to choose your fabrics, prepare and cut your pieces.  I chose do make my quilt in blue, lights, and a deep red with black print so it would go nicely in my kitchen.  Be creative and make yours anyway you'd like! If you want to work ahead, do so!

Your first hint for tiny pieces is to starch or use spray sizing on your fabric yardage.  Read lots more about starching/sizing your fabric here.  That post will answer your questions about how to properly starch, and why it's worth the trouble.  It's TOTALLY worth your time!

Let's meet back here next Friday to begin our sew~along.  I'm so, so jazzed to sew tiny quilts with you!

In order that we can all see each other's progress, fabrics, and quilts, please use hashtag #teenytinyquiltclub  Oh, it will be so fun to get inspiration from each other!!  

If you're not sure how to view photos tagged with #teenytinyquiltclub, you can enter it as search within Instagram and  Google's search bar.  So post away with our club hashtag.  

So....let the fun begin! 


Wednesday, March 4, 2015

Pre-Wash or Don't Pre-Wash?? That is the question!

You may have noticed that lately....I have a few red quilts out there.

And there are lots and lots of pretty red fabrics in your local quilt shop.

I have received more than a few emails asking about whether or not to pre-wash all of this red fabric.  

Do I pre-wash?  Is it safe?  Will the dye run??

That is an age old question, and I thought perhaps, with all this red fabric out there, that I should address this question.


First, let me share what I do.  I don't pre-wash anything.   
If you'd like to pre-wash...go right ahead.  There are exceptions to that rule, however.  I don't recommend pre-washing quilt kits unless you know for certain you have plenty of fabric.  Also, I wouldn't pre-wash precuts like 5 or 10 inch charms, or jelly rolls, and the like.  Many of the patterns using them use every inch and every thread, so you don't want the shrinkage that comes with pre-washing or you may find yourself short of the needed fabric.  

I don't pre-wash because I like the sizing the fabric has when it comes off the bolt.  When I'm about to work with fabric to make a new quilt, I add starch or sizing to my fabrics before cutting them!!  

Having stiffer fabric to work with aides you in many ways throughout the piecing process.  Because the fabric has more body, it behaves better thru cutting, piecing, and pressing.  To me, working with washed or un-sized fabric is like trying to style your hair with no conditioner or any helpful hair care product.  No mousse, no gel...just limp, unconditioned hair.  (You wouldn't want to see my hair without that stuff!!  Eeekkk!!)  Sizing and starch give the fabric a lot of body, and the difference is amazing!

But...what about the red dye??  If you wash the quilt without pre-washing the fabric, will the dye bleed and ruin your quilt?  

The answer to that question is.....with quilt shop quality fabric from a major, well-known manufacturer, you should not have any problem.  You would not need to pre-wash any fabric.

That said, when in doubt, TEST!  Test some swatches for yourself to be sure.  No manufacturer gives a guarantee because so many factors are at play.  What type of water do you have?  Hard, soft, well water?  How does it mix with the detergent you're using?  Any number of things can be happening, and because a fabric company has no control over that, they cannot give a guarantee.  But honestly, I trust the quality of really good quilt shop quality cotton.  

Does that make you feel any better?  Maybe...a little.  That's not good enough!  So, I did a test with one of my quilts so I can share the results with you.  
 The quilt above is the bonus project included with my Prairie Gathering Quilt of the Quarter program.  It's made of all the same red prints in the Prairie Gathering fabric collection.  The fabrics were never washed, but were heavily starched, then cut up, sewn and quilted.  The quilt has never been washed.....until now!  Notice I will use my everyday detergent and not a mild quilt soap.  I wanted to see what would happen when I washed it.  
I added a color catcher to the wash to see if it would pick up any dye that was released into the water during the wash.

It has loads of suds!
 This picture shows the quilt still wet and what the color catcher looked like when it came out of the washer.  It's really clean and clear.  
 Here you can see a close-up of the fabrics still wet.  The red dye has not run at all.  
This is a close-up of the quilt center after drying the quilt in the clothes dryer.  The quilt has that nice crinkle to it (LOVE that!!) and looks great.  

I hope this helps you feel more confident in using Marcus Fabrics.  Again, when in doubt, please test for yourself.  

The folks at Marcus Fabrics have a bit more to add on this subject on their blog today.  So, click here to visit the Marcus blog and read a bit more about this.  

Have you been Blog Hopping with us??  Our Spring Thyme Blog Hop has just begun!  Be sure to check out all of the designer's blogs for a free spring project, inspiration, and a yummy recipe.  Click here to see the full list of designers and the schedule.  

And, please return right here to blog on my day....MARCH 9th!!


Tuesday, March 22, 2011

Iowa Road Trip - Days Three & Four

I guess I'm a teacher at heart 'cause I love to teach.  Put me in a room with some fabric lovin' quilters and it's a banner day....and that's just what I had on Sunday!  Eighteen of the most delightful ladies  from the Eastern Polk Quilter's Guild and I spent the day talking shop.  We worked on skill building and honing quilting techniques. 


At the end our time together, I had fun doing what I love and they learned some new tricks of the trade.

I filled their heads with a whole lotta quilting hints, tips and secrets!  They taught me a few things, too, and I love that!


On Monday evening I was given a warm Iowa welcome from all the members of the Eastern Polk Quilter's Guild! 


Scattered Leaves Quilt - featured in (and on the cover of ) American Patchwork & Quilting magazine

They listened to my program about, among other things, the most useful quilting secrets, hints and tips I know (and wrestled from other quilting professionals!), as well as my (now almost famous) starch recipe for how I prepare my fabrics for piecing. 

Antique "Make-Do Primer" quilt

And took a look at a few quilts I brought for show-n-tell.  We had a lot of fun during our time together and I sure hope I get to come back to Iowa some day.  If you find yourself in the Des Moines, IA area, take the time to visit the quilt shops, go antiquing, and eat at a terrific array of wonderful restaurants because you'll be treated to some fine Iowa hospitality!!  My heartfelt thanks to everyone!!  Nicki and I had a wonderful time.