HomeMy WebsiteAbout mePocket PatchworkFreebie Patterns

Friday, May 8, 2020

Safe Keeping Sew Along ~ Part Four

Here we are....the final week of my Safe Keeping Sew along.  Week four?  Already?  These weeks seem to have flown by.

Our block this week is another favorite of mine....Cake Stand.
I adored this block long before I became a quilter.  There's something about a basket block that I just love.  Can't think of a version I don't like.
Cake Stand fabrics are from my New Circa Essentials and Bess' Flower Garden collections.
Let's get started....

Cutting Instructions for Cake Stand block


From the light print

Cut (1) 3 1/4" sq for large Half Square Triangle
Cut (1) 2 7/8" square - crosscut once diagonally
Cut (2) 2 1/4" squares for the small Half Square Triangles
Cut (2) 1 1/2" x 2 1/2" rectangles
Cut (1) 1 1/2" square

From red print

Cut (2) 2 1/4" squares for small Half Square Triangles

From black print

Cut (1) 3 1/4" square for large Half Square Triangle
Cut (1) 1 7/8" square - crosscut once diagonally

Directions

1).  Draw a diagonal line on the wrong side of (2) 2 1/4" light print squares.  Match with (2) 2 1/4" red print squares.  Sew 1/4" each side of the drawn line.  Cut apart and press to the dark.  Trim (4) Half Square Triangles to measure 1 1/2" unfinished.


2).  Draw a diagonal line on the wrong side of (1) 3 1/4" light print square.  Match with (1) 3 1/4" black print square.  Sew 1/4" each side of the drawn line.  Cut apart and press to the dark.  Trim (1) Half Square Triangle to measure 2 1/2" unfinished.  Save the remaining HST for another project.

3).  Using the (2) light print rectangles and the (2) black print triangles (previously cut once diagonally,) sew the triangles to the rectangles exactly as shown; press to the rectangle.

4).  Arrange the units for the block as shown.  Sew the small Half Square Triangle units to the large Half Square Triangles first.  Then, sew the rectangles to the HST unit, followed by the light print triangle at the bottom of the basket.  
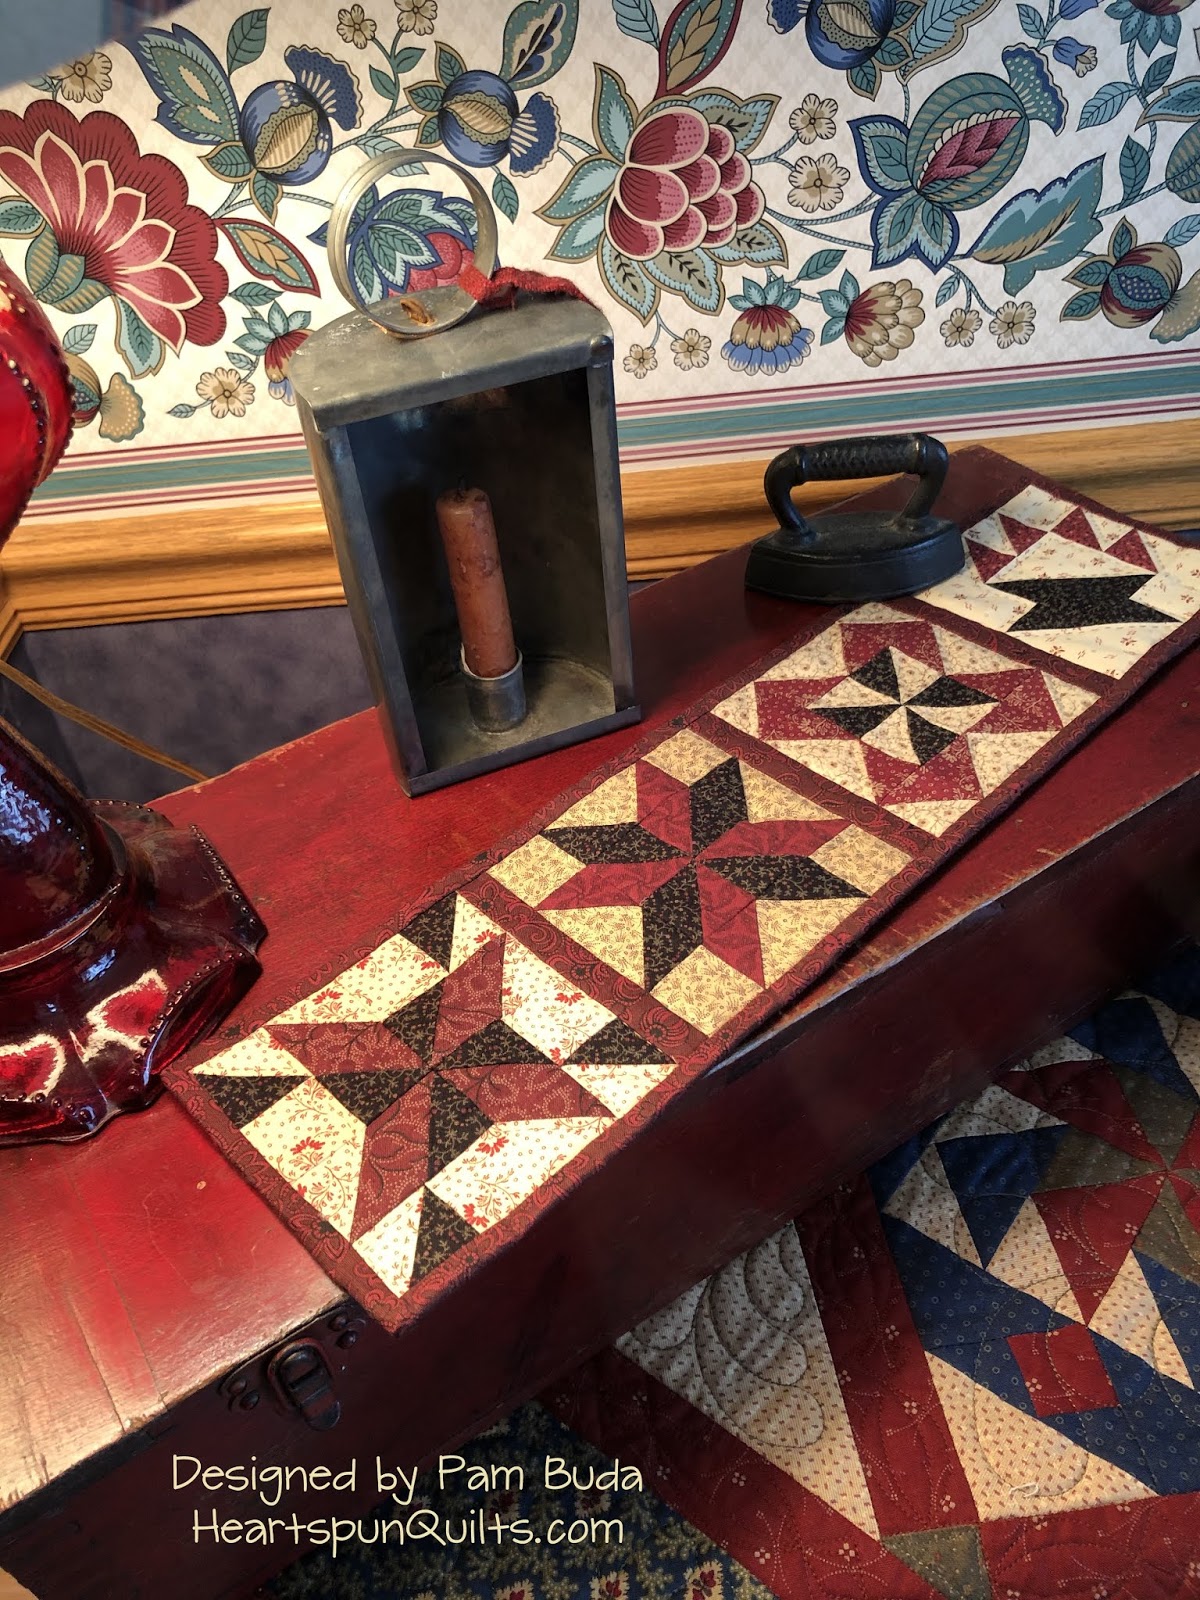
Your Cake Stand block should measure 4 1/2" square.
Safe Keeping Runner 
Here's what you've been making!  I separated my blocks with (3) 1" x 4 1/2" strips.  I auditioned the black and light prints but chose red strips for my quilt.  You should audition fabrics for your strips, too.  Red seemed to work the best for me for the binding as well.  Cut (2) 1 7/8" x WOF binding strips.

Do you like it?  Oh, I hope you love your scrappy little runner!
These little runners seem to work well in numerous places in my house.  
This antique spool cabinet is right next to my favorite family room chair.  After awhile, I get tired of looking at the same 'ol quilt and like to change things up.  Easy to do with a little runner like this.  
You can move them all over the house...even the kitchen near the stove.  

I hand quilted my runner because I love hand quilting.  You can easily machine quilt this baby, too.  I would love to see your Safe Keeping runner when completed.  Please post to your favorite social media using hashtag #SafeKeepingRunner 
That way, we can all see them anytime!  

It is my pleasure to bring fun, little projects for your stitching pleasure as a big, giant THANK YOU for all you do for me!!!! Please know how I appreciate your support, patronage of my business, emails, blog, Instagram and Facebook comments.  You keep me in business to be able to keep doing what I love, and hopefully what you love, too!  Thank you, thank you!
My next Quilt Archaeology kick-off will be May 22nd.  

In the meantime, did you know my friends at Red Crinoline Quilts are about to start a series of Monthly Mini Mystery quilts??  YES!!!  They don't often do mini's, so I intend to get them all!  The first mini is coming Monday, May 11th.  Check out the details here.

As we begin another weekend, stay safe and create at home.
I sincerely hope this sew along has brightened your day.  I'd love to read a comment from you.

I encourage you to follow me on Instagram and Facebook for behind-the-scenes posts that don't appear here on the blog.  

Be well, my friends....keep on stitching!

Tuesday, May 5, 2020

Wash Day

One of the things I really like in a quilt is a positive/negative block.  That means, using the same block but swapping the fabrics in the background and the block design.  Some blocks work well for this while others don't.  I really liked the effect with the block in my Wash Day quilt.

It's a simple block to piece....and set alternately with an Quarter Square/Hour Glass block, the positive/negative really stands out!  And....you get the big stars in the secondary pattern.  Winner, winner, chicken dinner!  Not to mention how I love that paisley border print!!  

The fabrics in Bess' Flower Garden really gives a pretty range of reds....
...and a lovely variety of light prints, too.

Oh, how I love me a red and light quilt!  
Truth is...you can swap colors and make Wash Day in blues and lights just as easily!

Support your local quilt shop and buy some Bess' Flower Garden for your stash.  They could really use a mail or curb side order from you right about now.  

If they don't have it, (I always want you to buy from your LQS first!!) you can order it on my website.

I have full Wash Day kits here.

Bess' Flower Garden Fat Quarter bundles here.

Bess' Flower Garden yardage here.
Don't forget to come back Friday for the 4th block and BIG reveal of our scrappy little runner sew along, Safe Keeping!  Ooohhh...I can't wait!

In the meantime, I hope you're well, finding good things to do to pass the time, and keeping your needle and sewing machines happy!  

Above all...be well!

Friday, May 1, 2020

Safe Keeping Sew along ~ Part Three

This is the third week of my Safe Keeping sew along.  Already?!
It seems time has flown when you think of this as week three, yet in so many ways, time seems to be standing still right now as we so wish this horrible virus would go away!  

Well...I'm hoping this little sew along is helping to keep you busy with something you enjoy doing.  

This weeks block is also a favorite for me.....
Colorado Beauty
It's very similar to the LeMoyne Star in the units we make for it.  Relatively easy, especially when I don't screw up the cutting instructions!  Sorry about that!  

Cutting Instructions for Colorado Beauty block:

From the light print
Cut (4) 2 1/4" squares for Half Square Triangles
Cut (4) 1 1/2" x 2 1/2" rectangles for Flying Geese

From the red print
Cut (2) 2 1/4" squares for Half Square Triangles
Cut (8) 1 1/2" squares for Flying Geese

From the black print
Cut (2) 2 1/4" squares for Half Square Triangles

Directions

1).  Draw a diagonal line on the wrong side of (4) 2 1/4" light print squares.  Match (2) with a 2 1/4" black print square, and (2) with red print squares.  Sew 1/4" each side of the drawn line.  Cut apart and press to the dark.  Trim (8) Half Square Triangles to measure 1 1/2" unfinished.

2).  Sew (4) black and light print Half Square Triangles into a Pinwheel unit measuring 2 1/2" square.

3).  Draw a diagonal line on the wrong side of (8) red print 1 1/2" squares.  Using the Connector Corner method, sew the red print squares to a 1 1/2" x 2 1/2" light print rectangle; press and trim.  Repeat on the other side of the rectangle with the remaining (4) red print squares.  Make (4) Flying Geese measuring 1 1/2" x 2 1/2" unfinished.  

4).  Arrange the units for the block as shown in the photo above.  Sew together into rows; press to Flying Geese units.
Sew rows together; press.  Your block should measure 4 1/2" square.
I received a few emails asking what fabric collections I used in making my blocks.  The reds come from Bess' Flower Garden.  Some of the backgrounds come from Bess as well.  The black print and the background in this week's block are from New Circa Essentials.  All are still available on my website....just in case they are call you.  

My quarantine organization continues.  It's getting boring now, but I carry on as this is the best time to do this.  Once the weather is nice here, I won't be doing anything like that until the fall.  So...I make myself continue up to one hour a day.  Little by little, it will get done.  What is keeping you busy?

Next month, I will be hosting another.....
I sure hope you join me!!  

You'll see the first sneak peeks on Instagram and Facebook, so please follow me there.  Once I decide on an official start date, I'll be sure to post that info here as well and a peek at the antique quilt we will replicate.  

In the meantime, have a wonderful weekend.  Next Friday is our last block and the reveal of what our sweet little scrappy runner looks like.  

Stay safe and keep creating!  Be well....

Tuesday, April 28, 2020

New Bundles and a Load of Scraps!

This quarantine has me cleaning, organizing and purging my stash.  Have you been doing this, too?
From cutting kits and fabric yardage, I had a giant pile of fabric scraps in all different sizes.  Less than 1/8th but at least 2" x WOF.  I mean a giant pile!  So, one evening, while watching TV,  I made boxes of scraps to sell.  They are looking for a good home!  

Each box has a wide variety of fabrics no smaller than 2 inches with most pieces in nice size chunks.  I made a box of scraps that I would want to receive.  

I only have a few right now and will offer them over time as I fill more boxes.  So, you'll have to check back from time to time.  

If you're interested in a box of scraps, you can find them here.
I've also added a new green color bank bundle.....
and a brown color bank bundle.

Click here to see all the color bank bundles.

Don't forget to visit my blog on Friday for the third installment of our scrappy little runner, Safe Keeping!  If you're just joining us, you can catch up here.

Oh...and guess what?  A new Quilt Archaeology is coming next month!!!  I'm hand quilting it right now.  You're gonna love it!

Stay safe and create....above all, be well.

Friday, April 24, 2020

Safe Keeping ~ Part Two ~ Correction


My apologies everyone!!  I have a mistake in the cutting directions for the LeMoyne Star.

From the light print:

Cut (4) 1 1/2" x 2 1/2" rectangles.....

not 1 1/2" x 3 1/2".

Also, trim your Half Square Triangles to 1 1/2"
square.

So, so sorry about this!!  At least your pieces are bigger than need be and you can cut them down to the proper size. 

My bad!!  I feel terrible....ugh!

The corrections are in my original blog post in red.  

Katie O...thanks for your comment alerting me to the problem.  I think it's my brain that's fried!


Safe Keeping Sew-Along ~ Part Two

Safe Keeping

Welcome to part two of our scrappy little runner.  I love star blocks and the LeMoyne Star is my favorite!

Cutting Instructions for LeMoyne Star block:

From light print

Cut (4) 1 1/2" x 2 1/2" rectangles  
Cut (4) 1 1/2" squares

From black print
Cut (2) 2 1/4" squares for Half Square Triangles
Cut (4) 1 1/2" squares

From red print
Cut (2) 2 1/4" squares for Half Square Triangles
Cut (4) 1 1/2" squares 

Directions

1).  Draw a diagonal line on the wrong side of (2) 2 1/4" red print squares.  Match each with a 2 1/4" black print square.  Sew 1/4" each side of the drawn line.  Cut apart and press to the dark.  Trim (4) Half Square Triangles to measure 1 1/2" unfinished.

2).  Sew the (4) Half Square Triangles into a Pinwheel unit measuring 2 1/2" square.

3).  Draw a diagonal line on the wrong side of (4) red and (4) black print 1 1/2" squares.  Using the Connector Corner method, sew the red print squares to a 1 1/2" x 2 1/2" light print rectangle (watch positioning of the black and red print squares); press and trim.  Repeat on the other side of the rectangle with the (4) black print squares.  Make (4) Flying Geese measuring 1 1/2" x 2 1/2" unfinished.  

4).  Arrange the units for the block as shown in the photo above.  Sew together into rows; press to Flying Geese units.
Sew rows together; press.  Your block should measure 4 1/2" square.
Block two done!  We're half way there.  I could make tons more LeMoyne Star blocks.....I just love every one of the them.  Can't wait to see yours!  Post a photo using this hashtag #safekeepingsewalong

Guess what else is new from Heartspun Quilts?
Freedom Trail made with Bess' Flower Garden fabrics (Marcus Fabrics) by Pam Buda
My new Freedom Trail quilt is all done!  I just love this quilt.  It's not too big, and not too small.  Perfect to cozy under while sitting outside on a cool and breezy summer night.  It will look great with my patriotic decor as well.  So happy it's finished. 
 I like to take some closeup photos of the fabrics, blocks and quilting.
I pulled the shades for soft daytime lighting to highlight the quilting and make it easier to see.
I chose this cute e2e design with stars and big swirls...love it!
Wouldn't it make a great Wounded Warrior quilt?!! 

Freedom Trail is one of two new quilts made with my new Bess' Flower Garden collection.  

Would you love a Freedom Trail kit?  Click here!

Prefer to own the pattern?  Sure....click here!

As we begin another weekend, stay safe and create at home.
I sincerely hope this sew-along cheers your spirits.

I encourage you to follow me on Instagram and Facebook for behind-the-scenes posts that don't appear here on the blog.  


Be well, my friends....keep on stitching!


Monday, April 20, 2020

Introducing our Heroic Hearts Campaign

Marcus Fabrics and all of the Marcus Designer Block Stars are pleased to introduce our... 
Heroic Hearts Campaign!

We teamed together to bring you a new and special project for giving back to someone special in your life and community during this pandemic.  Thinking you might like to take a break from your (awesome) mask making, this is not only the perfect gift for a First Responder or Front Line worker.....you'll also be a big help to your favorite quilt shops who really need you, too!!

My fellow Marcus designer, Sarah Maxwell of Designs by Sarah J , designed the Heroic Heart Tote bag!!  
Isn't it the sweetest?!!  The tote bag....of course!

It's easy, even if you've never made a tote bag before.  Wanna know how you can help?

Call your favorite quilt shop and ask them to put a kit together for you.  You'll be helping a small business who needs your order!  Then, you can make the Heroic Hearts Tote bag and give it to a special person in your life, to thank them for their service.  Fill the tote with all kinds of goodies that would make their life a little better and show them how much you care.

If your local shop is not participating (you may want to give them a week or two to catch up with us,) you can use your own fabrics and get the pattern FREE of charge on the Designs by Sarah J website here.

Or, you can purchase a kit from me for the same Heroic Heart Tote I made with my Bess' Flower Garden fabric collection for Marcus Fabrics.  The kit includes the free pattern.  Click here.
Ryan is a firefighter/paramedic and Nicki is an RN working at hospital, both are caring for Covid patients.
I had to share a photo of my two favorite heros!  

We hope you join us to support your local quilt shop and show a First Responder or Front Line worker how much we appreciate them all!  They could use a little love right about now.  

If you'd like to take a look at the Heroic Hearts Tote all the other designers created...here are their website/blog links.

Red Crinoline Quilts

Temecula Quilt Co.

Designs by Sarah J

Nancy Rink Designs

Quilt Doodle Designs

Calico Patch

Plum Cute Designs

Also, post your quilt fabric choices, sewing progress and completed Heroic Hearts Tote using the following hashtags:

#heroicheartstote
#heroichearts
#heroicheartsblockstars
#heroicheartswithmarcus
#marcusblockstars
#staysafeandcreate

#staysafeandcreatewithmarcus

Imagine how many Heroic Hearts Totes we can see in just a few weeks!!  

Tote bag is 17" x 17" 

Have fun, stay safe and create.  Above all...be well!


Friday, April 17, 2020

Safe Keeping Sew-along ~ Part One

Safe Keeping

Welcome to part one of our scrappy little runner sew-along.  Let's get right to work.
Cutting Instructions for Eccentric Star block

From light print 
cut (2) 2 1/4" squares for Half Square Triangles
cut (8) 1 1/2" squares 

From red print
cut (4) 1 1/2" x 2 1/2" rectangles

From black print
cut (2) 2 1/4" squares for Half Square Triangles
cut (4) 1 1/2" squares

Directions

1).  Draw a diagonal line on the wrong side of (2) light print 2 1/4" squares.  Match each with 2 1/4" black square.  Sew 1/4" on both sides of diagonal line.  Cut apart, press to black.  Trim them to 1 1/2" square.

2). Using (4) 1 1/2" light print and (4) 1 1/2" black print squares, draw a diagonal line on the wrong side of all (8) squares.  Refer to the rectangle unit above the block in the photo above.  Sew a light print and a black print connector corner square to the red rectangle.  Press then trim.  Repeat to make (4) connector corner rectangle units measuring 1 1/2" x 2 1/2" unfinished.

3). Sew the remaining (4) 1 1/2" light print squares to the (4) Half Square Triangles as shown in photo; press to the light square.  Make (4) units measuring 1 1/2" x 2 1/2" unfinished.

4).  Sew a Half Square unit to a connector corner rectangle unit; press.  Make (4) units measuring 2 1/2" x 2 1/2" unfinished.  

5).  Arrange the units for the block as shown in photo above.  Sew together into rows; press for opposing seams.  Sew rows together; press.  Your block should measure 4 1/2" square.  
That was easy, right?  

We're well on our way.  I hope you enjoyed piecing this block as much as I did.  It's a variation of the classic Eccentric Star block.  I'm already looking forward to next week!  

The best way to get the instructions for the sew-along is to receive my blog posts via email.  Each time I post to my blog it will come to your email inbox!  Then, you can print the directions if you'd like.  

To do this, click here to go to my blog.  Scroll down until you see
the Follow by Email icon shown at the right.

Then, simply enter your email address and submit.  You will receive a verification email from FeedBurner.  You must verify your email with them by following the directions to click the link.  That's it!  Easy, peasy.  You'll be all set for next weeks post to come to your inbox.

How is everyone doing staying home?  I'm feeling cabin fever setting it...longing to go out to restaurants and be with friends.  It helps to take a drive...not a long drive, but even a short drive around the neighborhood.  It's not helping that we are having unseasonably COLD weather here in Chicagoland.  It snowed yesterday and we're expecting up to 6 inches of snow today.  Oh, com'on!!!  The snow is gone in 24 hours, but it's still cold enough to snow.  Not helping the cabin fever situation.

What is helping is that I've been very busy.
My fellow Marcus Fabrics designers and myself have been brain storming ideas on how to help the quilting community; quilters and shop owners alike.  We formed the new Marcus Designers Block Stars and our first project is Heroic Hearts.  Watch for our big announcement next week!  
Should you be in need of retail therapy, I just added bolts of fabric from my new Bess' Flower Garden to my website.
All new blues....all new light prints...

all new red prints.  You'll notice that many of the fabrics I used in my scrappy little runner are from Bess' Flower Garden!  I have fat quarter bundles of this collection as well.  


I also just received a shipment of bolts of the pretty neutral print from Rachel's Tribute.  I know many of you have been wanting this fabric.  Click here to order.  


And last but not least, I have a whole new crop of color bank bundles.  I know you love these bundles as much as I do.  
There are three new shirting bundles and one new neutral bundle.
I'm also cutting a new brown color bank and green color bank bundle....coming very soon!  You can browse all of my fabric bundles here.

That's all the news for today.  I'm already excited to share next weeks block with you.  It will be here before we know it.  

So stay safe and create at home.  I encourage you to follow me on Instagram and Facebook for behind-the-scenes posts that don't appear here on the blog.  

Be well, my friends....keep on stitching!


Tuesday, April 14, 2020

New Sew Along Inspiration

Hi to everyone from my home to yours!

I'm all ready to begin our little sew along and wanted to share my inspiration with you.  I'm not a lover of large table runners.  I find them too big and bulky and they're almost never the right size for where I would want to use them.  I much prefer square toppers or really small table runners. 
The runner you see in the photos above is the perfect size for me.  I can have the runner on top of the spool cabinet and still have a place for my tchotkes.
It's also amazing how versatile they are.
Used with permission - Meredith Corp - American Patchwork & Quilting magazine
Many years ago, this little cutie appeared in a special edition of American Patchwork & Quilting.....
Used with permission ~ Meredith Corporation

It is long out of publication but you may be able to find it on eBay.  Anyway....

I do love my little runners and have been wanting to make a new one for the large spool cabinet next to the chair where I stitch.  

So, a scrappy little runner is what we will be making.  It's just four blocks that are four inches.  Won't be a lot of work and you'll have a mini runner of your own in no time.   And, I'll show you how many places I can use it in the house beyond just my spool cabinet/end table.

Here's what you'll need to gather.......

These are the fabrics I used in my little runner.  No yardage is required...work from scraps.  That's what I did.  

I suggest you choose a color theme to work from, or go all out scrappy.  Each of my blocks have three fabrics.  

I'm calling this sew along.....
Safe Keeping

My scrappy little runner, Safe Keeping, will begin this coming Friday 4/17.  I'll post each of the four blocks in four consecutive weeks with the 'big 'reveal the fifth week.  Oh, boy....this is gonna be fun!!

Coming soon from all of the Marcus Fabrics Designers.....


Marcus Block Stars present......
Our  new collaborative project

I'm so JAZZED!!!  It's gonna be big!

Stay safe and create.....

Be sure to follow me on Instagram and Facebook for behind-the-scenes photos and newsy posts!  


Sunday, April 5, 2020

Winners, New Patterns and the SAL

It is wonderful to read your comments!  I really feel a connection with you all when you comment and share your thoughts.  Thank you for taking the time to do so.  

It seems that you were almost 50/50 on having the SAL instructions come four consecutive days, or four consecutive weeks.  But...four consecutive weeks seems to be the what the majority of you asked for.  So...that's what I'll do.  More about the SAL in a moment.

My son chose four random comments for me choosing the recipients of the red stripe fat quarters.  They are......


Jan who said....

What a darling quilt. Thank you for a sew along during this time to keep us busy & use up our stash. Which ever plan works for you is good as we’re home for awhile. When we are released back to shop the quilt stores better be ready for all who want to touch, see color & what’s new plus refill supplies. Ordering online just isn’t the same.

Deborah who said....

Once a week for your new sew along. Can’t wait I love everyone you’ve done.
Hi from Fredericksburg, TX

Patti who said....

I really like the quilt you made from your leftover fabric. And how generous to hold a sew along. I would probably prefer the steps on a weekly basis, but I can also adapt to either. Thanks for your generosity.

Sue SA who said.....

Four parts over four weeks please! I know we are in self isolation madly sewing, but it gives me something to look forward too...and remember which day of the week it is!

Please email you mailing address to Pam@HeartspunQuilts.com  

I will try to begin the sew along as soon as possible.  I'm a little behind here because Covid is keeping my friendly helpers at home.  So, I'm trying to do myself what two people do for me, along with my usual work.  But, I'm highly motivated to get this going because it's a quilt I've wanted to make for awhile.  You are all great motivation to get going!
In the meantime, I've added several new items to my website.
Freedom Trail is one of two new patterns made with my new Bess' Flower Garden fabric collection.  I love this patriotic quilt and I'll display and use it from May through August.   A terrific summer quilt....or make it for your favorite hero!!  

I will have a limited number of Freedom Trail kits....coming very soon.  Possibly next week.

If you'd like to order the Freedom Trail pattern, you can do so here.

Wash Day is the second quilt designed with fabric from Bess' Flower Garden.  Oh, how I love me a red and light quilt!!  I set the quilt blocks with alternate hour glass blocks in deep, dark red which make a secondary pattern of stars.....love that!  I will use this quilt at Christmas time and through out the summer months.  


And if you'd prefer to make Wash Day in blues....or another two color combo....
it would look just lovely no matter what colors you choose!  

I will also have a limited number of Wash
Day kits in the red version....coming as soon as I can finish cutting them.  

I miss my crew that works with me!!  

If you'd like to order the Wash Day 
pattern, you can do so here.

Well...best get back to work.  I wanna get started on the SAL quilt!

In the meantime....prayers for your safety, that we all stay healthy.  Wishing happy stitches.....Be well.

Wednesday, April 1, 2020

Vintage Treasures Is Here!! No Foolin'!

They're finally here!!  The books were delivered yesterday and I'm over-the-moon jazzed that the book is ready to send to all who pre-ordered it!!  Yahoo!!  Guess what I'll be doing today and tomorrow?  I couldn't be happier.
Olde Postage ~ Designed by Pam Buda ~ Vintage Treasures book for Martingale Publishing
Olde Postage, the quilt pictured above, is one of my all time favorite small quilts.   It's in my new Vintage Treasures book.  What's not to love about this quilt?  It's super scrappy, super easy and it catches your attention drawing you in to look at the fabrics.  No matter when I glance at it, I always have to look closer at those sweet prints.  

I made this quilt from the leftover squares from when I was piecing my Circa 1880 Nine Patch quilt.  I pieced all the little squares as leader/enders, and it seemed to take no time at all.  

One of the favorite things I love about this quilt is the fussy cut red print border I used to separate the smallest squares from the larger squares.   It's a print from my Prairie Stitches fabric line way back in 2014.  When I was digging through my stash to find this print, I came across a bunch of fat quarters I had tucked into the yardage.....for what reason I don't know.  So, I decided to hold onto them for a giveaway when the book came out.  

And that's exactly what I'm going to do today!  Hang on a moment though before you leave a comment....read on.

Very soon, I'm going to host a little sew-along.  A freebie that's something really quick and easy to do.  It has four parts. 

Here's my question......Would you like all four parts to come in once a week for four weeks?  Or would you prefer they come four consecutive days?

Leave a comment on my blog answering the question above.  I have four fat quarters of the special stripe fabric used in my Olde Postage quilt to give away to four quilter friends.  Winners will be chosen on Sunday, April 5th.  To be fair and transparent to everyone, only blog comments are eligible.

 Now....I'm off to my shipping room to package up all these book orders and get them in the mail.  My thanks for everyone for your orders, emails and comments of support.  Without you, I would not be in business and able to continue doing what we love.  Thank you, thank you!! 

Dear friends, take good care of yourselves and your family.  Have happy stitches and above all, be well.......